Mostrar mensagens com a etiqueta Thinlits. Mostrar todas as mensagens

terça-feira, 2 de abril de 2013

Paula Pascual Mini Album


"Olá! Hoje gostava de partilhar com vocês como podemos utilizar os Framelits para decorar as bordas de um mini álbum."

"Hoy me gustaría compartir con vosotras la forma de usar los troqueles Framelits en los bordes de las hojas, para decorar un mini álbum sencillo."

"Today I would like to share how to use the Framelits on the edge to decorate a simple mini album."

"Neste projecto utilizei papéis da colecção Indie Chic da My Mind's Eye e os seguintes cortantes da Sizziz: Sizzix Framelits Die Set 5PK - Wrappers, Circle (658613); Sizzix Thinlits Die Set 4PK - Dotty & Flowers Edges (658583); and Thinlits Die Set 4PK - Hearts & Flowers Edges (658584)."

"Decidí usar para este proyecto papel My Minds Eye - Indie Chick, y los siguiente troqueles Sizzix: Sizzix Framelits Die Set 5PK - Wrappers, Circle (658613); Sizzix Thinlits Die Set 4PK - Dotty & Flowers Edges (658583); y Thinlits Die Set 4PK - Hearts & Flowers Edges (658584)"

"I did use for this project My Minds Eye papers - Indie Chick, and the following Sizzix dies: Sizzix Framelits Die Set 5PK - Wrappers, Circle (658613); Sizzix Thinlits Die Set 4PK - Dotty & Flowers Edges (658583); and Thinlits Die Set 4PK - Hearts & Flowers Edges (658584)."

"Os cortantes têm 6"de altura mas pode trabalha-los em contínuo. No entanto para um mini-álbum, 6" é perfeito. Coloquei os papéis em cima da mesa de forma a coordenar as diferentes cores. Depois cortei os papéis de modo a ficarem com 6"x12"."


"Los troqueles tienen 6" de alto, pero los podrá trabajar en una línea continua. Sin embargo, para un mini álbum de 6" es perfecto. Coloqué los papeles en cima de la mesa para poder ver los colores y  la forma como se conjugan. Entonces recorté los papeles en la medida de 6 x 12"."


"The dies are 6" tall, but you could work them in a continuos line. However for a mini album 6" is perfect. I place the papers on the table so I can see the colours how they look together. Then I just trimmed the papers  to measure 6" x 12"."

"Peguei no papel de cima e vinquei-o a 4" de uma das laterais e corteio-o na Big Shot. Coloquei a borda do cortante alinhada pela margem direita do cartão. Seguro o cortante com um post-it ou fita adesiva e corto."

"Cogí el papel de arriba y lo marqué a 4" del borde y lo troquelé. Coloqué el troquel alineando el borde derecho del borde con el borde derecho de la tarjeta. Lo fijé con fita adesiva y lo troquelé."

"I took the top paper and score it at 4" from one edge and die cut it. I place the frame lit aligning the right edge of the edge with the right edge of the card. I secure it with tape and die cut it."

"Depois fiz o mesmo com o papel vermelho das flores. Com todos estes cortantes, uma vez que é necessário colocá-los na big shot numa linha horizontal (paralelamente aos rolamentos) será provavelmente necessário passar o cortante várias vezes para ter a certeza que o corte ficou perfeito. É fácil verificar na parte de trás do cortante como está o corte."

"En seguida hice lo mismo con el papel rojo con flores. Va a necesitar colocar todos estos troqueles en una Big Shot, en una línea horizontal (paralela a los rodillos) y probablemente tendrá que pasarlos varias veces para asegurarse de que los corta totalmente. Es fácil verificar en la parte de atrás si la hendidura quedó completa."

"I then did the same with the red paper with the flowers. With all these dies becasue you will need to put them on the Big Shot on a horizontal line (in parallel to the rollers) you probably will need to go through several times through to make sure that it cuts trough. It is easy to check on the back to see if the indentation is complete."

"Depois de ter a certeza que o corte ficou perfeito, pode retirar o cortante gentilmente. Coloque o papel na tábua de vincar e utilizando o cartão de cima como medida vinque no local correcto a folha vermelha. Neste caso tinha de vincar a 5" do limite da folha."

"Después de saber que está correctamente cortado, retírelo suavemente. Colóquelo después en la tabla de marcar. Para asegurarse de que la posición de cada página está perfecta, coloque la página de arriba en el topo y use la tarjeta de arriba. Anote la distancia de que irá necesitar. En este caso, necesité marcar a 5" del borde."

"Once you know if has cut properly, you can gently remove it. Then place it on the scoring board. To make sure the placing of each page is perfect, place the top page on top and use the top card. Make a note of what distance you will need. In this case, I needed to score at 5" from the edge."


"Corte a última das folhas, repetindo as instruções de cima para vincar. Neste caso vinquei a 5 5/8"."

"Troquele el resto de las páginas e repita las instrucciones de arriba para marcar. En este caso he tenido que marcar la ultima tarjeta a 5 ⅝"."

"Die cut the last of the pages and repeat the above instructions to score. In this case I had to score the last card at 5 ⅝"."
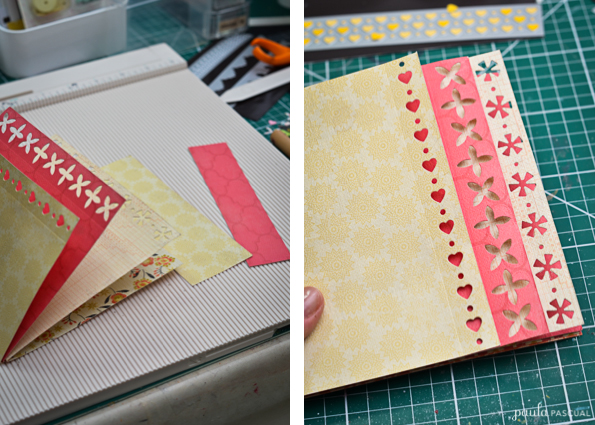
"Juntei as folhas todas e cortei o excesso do lado direito."

"Los junté a todos y recorté el exceso en el lado derecho."

"I assembled them all together and trim off the excess on the right hand side."

"Para unir as páginas umas às outras, utilize uma régua com medição e furos na linha da dobra. Centre a régua (3 polegadas para cada lado) e marque a 1" e 2" de cada um dos lados do centro."

"Para unir las páginas, coloqué la regla para perforar Tim Holtz en la línea marcada. Centré la regla (3" en cada lado) y perforé una marca a 1" y 2" del centro, en cada lado."

"To bind the pages together, place the Tim Holtz piercing ruler on the scored line. Centre the ruler (3" either side) and pierce or mark at 1" and 2" at both sides of the centre."

"Dobre todas as páginas e fure um meio círculo com um furador de mão (como crop-a-dile) de modo a que os furos fiquem como a imagem de cima."

"Doble todas las páginas y haga un semicírculo usando un perforador de mano. Así, los cuatro agujeros se parecerán con los de la foto de arriba."

"Fold all the pages and make half a circle using a handheld hole punch. So the four hole look like the picture above."

"Para passar o fio nas páginas, usei uma agulha de encadernação. Passe fio de pasteleiro (baking twine) de dentro para fora de uma ponta à outra, passando de um furo para o seguinte e assim sucessivamente."

"Para coser las páginas usé una aguja de encuadernación (de abertura ancha pero con punta roma). Cosa con la cinta Baking Twine del interior hasta el agujero más cercano y otra vez para fuera hasta el próximo y una vez más para dentro hacia el próximo. Entonces fuera para uno de los más cerca hacia el centro y para dentro para el siguiente."

"To thread the pages, I used a bookbinding needle (large aperture but rather blunt at the pricing end). Thread the Baking Twine from inside to the nearest hole and out again at the next, in again to further one. Then out of one of the closer to the centre and in at the next one."
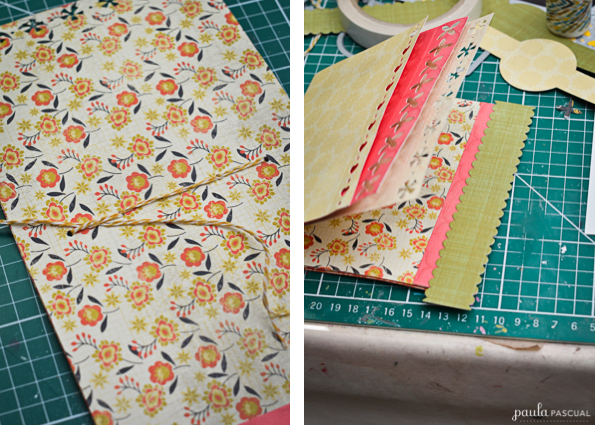
"Por dentro deve ficar assim o que é basicamente como deve ficar por fora também. Dê um nó nas pontas para segurar. Agora está pronto a ser decorado."

"Por dentro debe parecerse como este de arriba que, más que nada, es como debe parecerse también el exterior. Haga un nudo para segurar las puntas. Ahora está lista para decorar."

"Inside should look like this above, which is pretty much how it should look outside as well. Make a knot to secure the ends. Now you are ready to decorate."

"Para a capa usei o cortante Circle Wrappers e imprimi o título com a minha impressora no papel da My Mind's Eye e recortei-o com o círculo mais pequeno- que mede 1 3/8"."

"Para la capa usé un Circle Wrapper. Imprimí el titulo usando mi ordenador y lo troquelé con los círculos más pequeños, que miden 1 ⅜"."

"For the cover I used the Circle Wrappers, I printed the title using my computer and printer and die cut with the smallest circle die - measuring 1 ⅜"."

"E estas são algumas das páginas interiores decoradas com fotos do meu gato, Wasabi!"

"Y estas son algunas de las páginas interiores, decoradas con fotos de mí gato, ¡Wasabi!"

"And these are some the inside pages decorated with photos of my cat, Wasabi!"


"Deixei algumas páginas em branco para adicionar mais texto e fotografias à medida que os anos vão passando".

"Dejé algunas páginas en blanco pues así podré adicionar más fotos y texto a lo largo del año."

"I left some pages blank so that I can add more text and photos as the year goes along."

"Espero que tenham gostado

"I hope you enjoyed this mini album. See you in the end of the month!

quarta-feira, 6 de março de 2013

Como funcionar com thinlits * How to work with thinlits

Olá a todos! O post de hoje é de certeza o post mais técnico que escrevemos no blog mas achamos que era mesmo importante esclarecer algumas dúvidas sobre os novos cortantes da Sizzix: os Thinlits! Estes cortantes, em muito similares aos framelits, destinam-se a cortar papel. A grande diferença entre uns e outros é o detalhe que se consegue obter com os novos cortantes: são muito mais minunciosos! 

Hi everyone! Today's post is for sure the most technical one we ever posted on the blog but we thought it was important to explain a little how the new Sizzix dies work: meet the Thinlits! These dies are in fact a lot similar to framelits and they are destined to cut paper. The main difference is that the detail on the new dies is tremendous which allows you to make really detailed cuts.

Aqui está alguns thinlits * Here are some thinlits


Cada pacote de Thinlits vem com uma bolsa plástica onde se coloca a folha da frente da embalagem, para assim identificar melhor o interior e claro assim estes pequenos cortantes ficam bem arrumados.

Each pack of  Thinlits comes with a plastic pouch where you can place the front page of each day so that not only you can easily identify the inside, but also keep the dies well stored together.

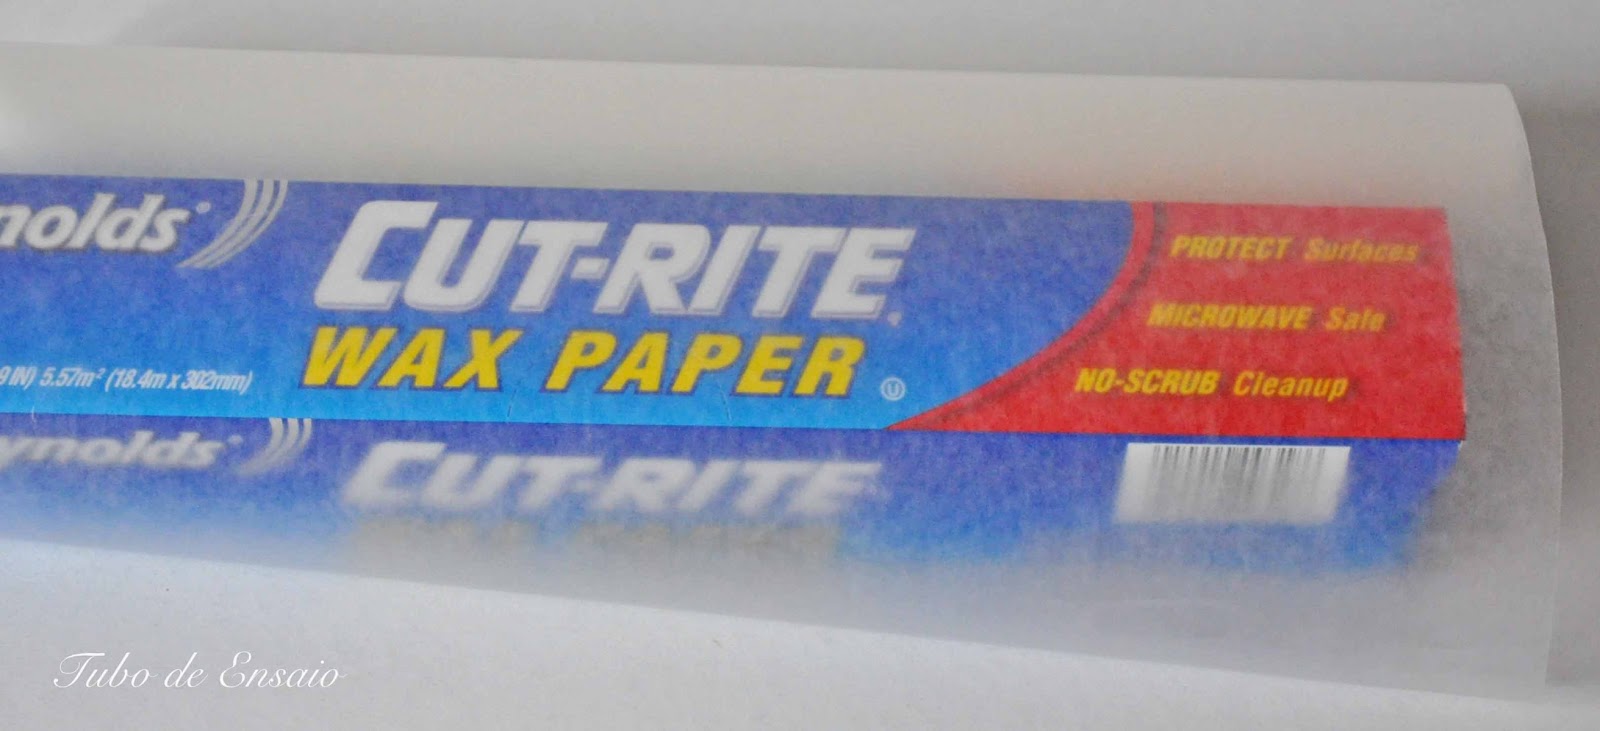
Este é o famoso wax paper de que temos falado. Embora  muito similar ao papel vegetal, o wax paper é mais fino e como o próprio nome indica com uma aparência mais gordurosa. Não é fácil encontrá-lo no nosso país por isso pergunte-nos onde o pode adquirir.

This is the famous wax paper we have been talking about. Although very similar to parchment paper, this one is thinner and as the name itself says, it has a waxed look and feel to it.


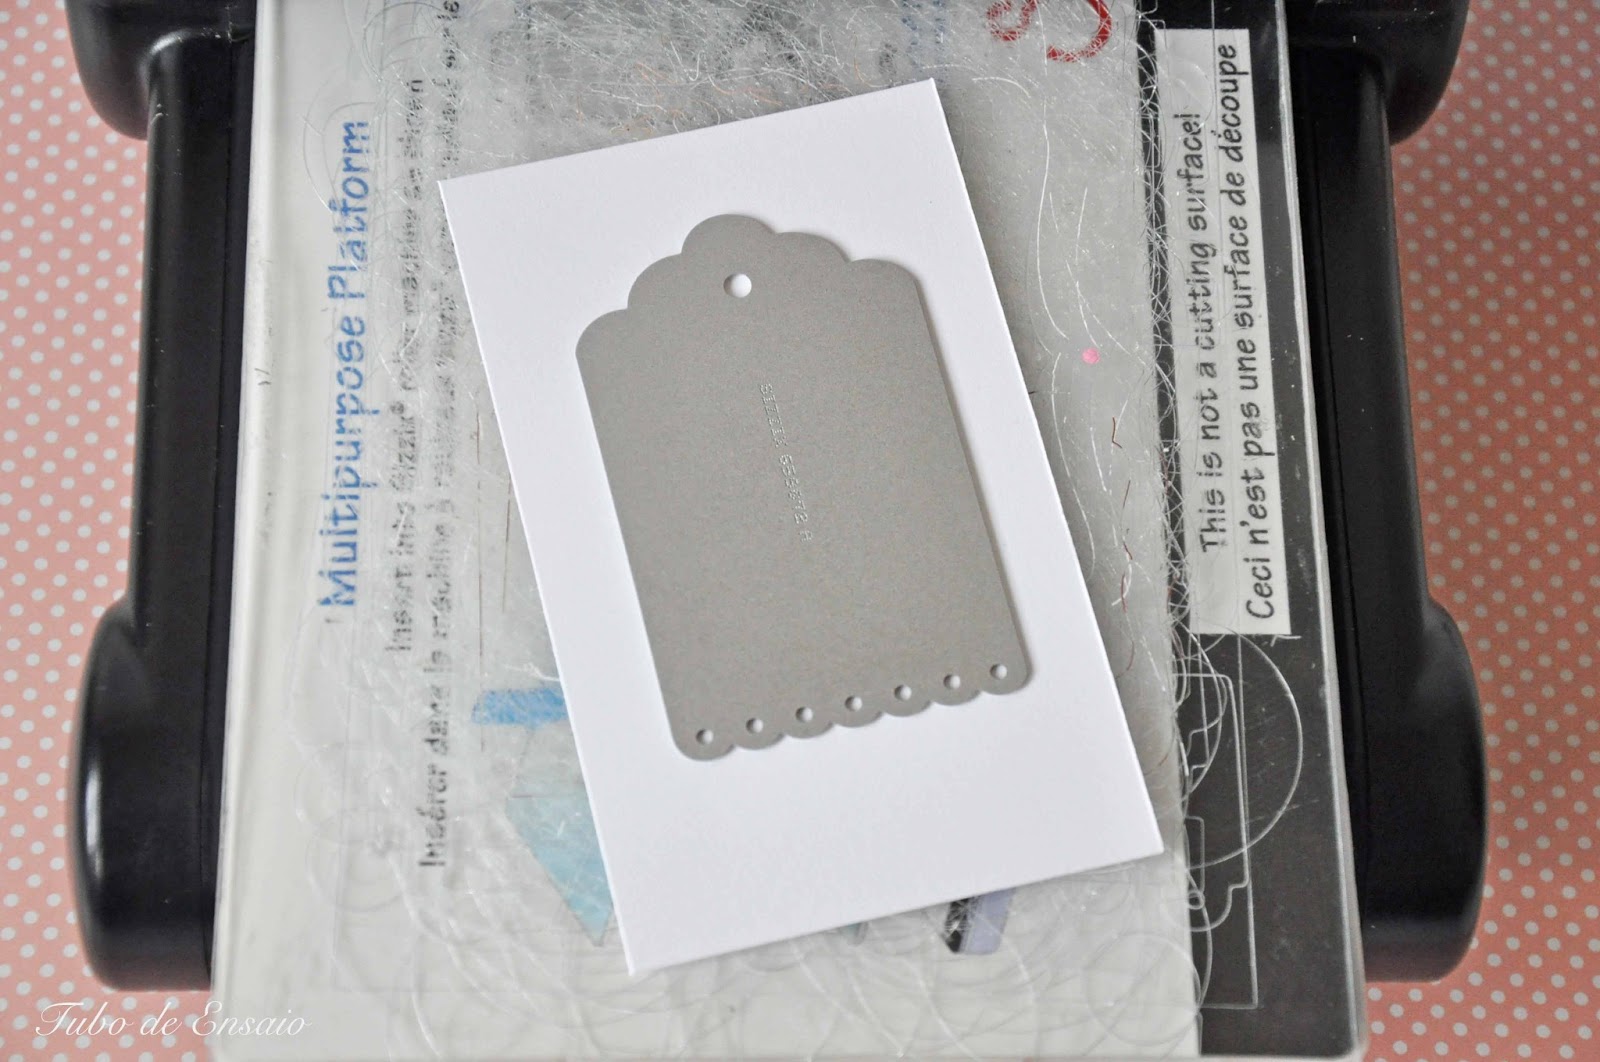
De volta aos thinlits. Existem diferentes tipos de cortantes, maiores e mais pequenos. Este é um cortante que faz uma etiqueta e é parte de um conjunto de 4. Podemos cortar o papel sem wax paper pois o cortante tem pouco detalhe.

Back to the thinlits. They come in different sizes and type of details. This one is a tag from a set of four. We can cut paper without any help because it is a very simple die.


Alguns destes cortantes, como é o caso deste, depois de cortado ficam umas zonas a descoberto. Estas podem ser utilizadas para fazer embossing, neste caso usando um distress ink pad. Com o papel ainda no cortante, passamos gentilmente a esponja nas aberturas. Quando retiramos o cortante, as marcas feitas pela tinta passam para o papel.

Some of these dies, such as this one, after it's cut it stays with some areas where you can see the paper. They can be used for embossing and in this case we used a distress ink pad. With the paper still on the die, gently press the foam on the applicator with the ink of your choice. When you remove the die, the marks made by the ink remain on the paper.


 Divertido, não? * Fun, right?


Depois há Thinlits mais detalhados como é o caso deste "doily". Para cortantes como este o uso de wax paper é essencial para que o corte saia perfeito mas sobretudo para que não tenha de estar a empurrar com um bico os pequenos pedaços de papel que ficam nas aberturas.

Then you have Thinlits that are more detailed like this doily one. For dies such as this the use of wax paper is really important so that not only you reach a perfect cut but also so you won't have to push all the small bits left stuck to the paper with a small piercer.

Corte o Wax paper do mesmo tamanho que o papel que está a cortar e coloque o cortante seguido do Wax paper e depois o papel que quer cortar. Coloque entre as placas de acrílico e dê à manivela para a frente e para trás.

Cut the wax paper the same size of the paper you want to cut and then put the die, followed by the wax paper and then your paper. Put them in between the cutting plates and turn the handle back and forward.


Depois de passar o cortante para a frente e para trás, rode-o 90 graus nas placas de acrílico e volte a passar nos dois sentidos. Atenção que este procedimento só é preciso para estes cortantes com muito detalhe!

After passing the die back and forward, turn it 90º degrees on the cutting plates and cut again twice. You only have to do this with these detailed dies!


O corte sai perfeito e sem esforço! Até a sobra de wax paper é bonita e pode ser usada para efeitos decorativos!

The cut is just perfect and effortless! Even the wax paper shape is pretty and can be used for decorative purposes.

Apesar de não parecerem estes cortantes têm pormenores muito pequenos e finos, como as patas do pássaro e as antenas da borboleta. Recomendamos que use nestes casos wax paper para que tudo saia logo à primeira e sem rasgões ou imperfeições.

Although these dies look really simple, they have really small and thin details like the bird's feet and the butterfly anthena's. We recomend that you use wax paper in these cases so that everything just pops out after you cut without any tears or imperfections.


Reparem no pormenor das patas e das antenas, perfeitamente cortadas! * Notice the details on the paws of the bird and the anthena's on the butterfly 


Embora não tendo muito detalhe use o Wax paper para cortantes como este em que não quer passar o tempo a empurrar pequenos pedaços agarrados ao cortante!

Although this die doesn't have a lot of detail use wax paper in cases like this where you don't want to spend any time taking out small bits of paper still attached to the die!

E cá está o resultado final: 3 pequenos projectos usando elementos cortados com os thinlits. Para fazer os cartões usamos papéis da nova colecção da pebbles Love You More que é linda para usar agora que os dias parecem querer sorrir de vez em quando. Para além disso nós temos um fraquinho pela designer atrás desta linha...

And here is the final result: three projects made using the element cut with the thinlits. To make the projects we used papers from the new Pebbles line, Love you More that is just perfect for now that the sun beams start coming once in a while. Besides we do have a "crush" on the designer behind this line....


Esperamos que não tenham ficado quaisquer dúvidas mas não hesite em contactar-nos via facebook ou para o email scrapbookingwithtubo@gmail.com caso necessite de qualquer outro esclarecimento. Agora divirta-se a criar pois estes cortantes são fantásticos!

We hope that all your worries about using these dies are cleared but if not don't hesitate to contact us thru facebook or by email to scrapbookingwithtubo@gmail.com. Now go and have fun because these dies are just amazing and so much fun!

sábado, 2 de março de 2013

Thinlits+Framelits= beautiful cards

Temos a certeza de que já ouviu falar nos novos cortantes da Sizzix, os Thinlits! Estes cortantes, em muito semelhantes aos framelits, são ideias para trabalhar em pequenos projectos ou para dar pormenores a layouts. Desta vez resolvemos fazer 3 cartões, utilizando papéis e cortantes bem diferentes para obter os resultados que pretendíamos.

We are quite sure you have already heard about the new Sizzix dies called Thinlits! These dies, in much similar to framelits are just the thing to use in smaller projects or to give details to layouts or home decor projects. This time we decided to make 3 cards using different papers and very different dies so we could get the result we wanted!

O primeiro cartão, dedicado ao Dia do Pai, foi feito usando papéis da colecção Miss Caroline da My Mind's Eye, o framelits 658601 (Banners by Paula Pascual) e o conjunto de Thinlits 659063 (Top hats & Moustaches). Masculino mas muito divertido, certo?

This first card can be usedforo Father's Day and it was made using papers from My Mind's Eye line, Miss Caroline ,the framelits 658601 (banners by paula Pascual) and the thinlits set 659063 (Top hats & Mustaches). Very masculine but fun at the same time, right?


Este segundo cartão é bem mais delicado e foi feito com papéis Tell Your Story de Teresa Collins Designs. Mesmo a propósito para a estação que se avizinha em que estas são as cores da moda! Usamos o framelits 657552, Circles scallop e o conjunto de Thinlits 659110 (For the record 2). O doilie deste conjunto foi recortado em papel vegetal mas com a ajuda do precioso wax paper sem o qual seria impossível recortar com este pormenor! Usamos também wax paper para cortar a borboleta. O processo consiste em colocar este papel entre o cortante e o papel que queremos cortar.

This second card was made using Teresa Collins papers, Tell your story and they couldn't be more up to date with the coming fashionable colors for this spring! We used the framelits set, circls scalloped, 657552 and the new thinlit set 659110, For the record 2. The doilie on the card was cut out of very thin vellum but to help the process of removing all the small bits that stay attached to the paper, we used wax paper. The paper is placed between the die and the paper. We also used wax paper to cut the butterfly!


Este terceiro cartão é uma verdadeira declaração de amor, até pelo trabalho que aqui está colocado! Usamos papéis da colecção Nostalgia da My Mind's Eye e a base do cartão foi cortada com os maravilhosos L card dies da Sizzix, o 658702, Majestic flip-it card. Depois usamos dois conjuntos diferentes de thinlits: o 659111 (Hello Summer) e o 659072, Tags by Rachel Bright.  Apesar dos pequenos detalhes, é notável a precisão de corte destes novos cortantes! Claro que o wax paper foi essencial para estes cortes perfeitos!

This third card is a true declaration of love, even because of all the work put into it! We used Nostalgia paper line from My Mind's Eye and the base of the card was cut using the marvellous L dies by Sizzix. In this case we used 658702, Majestic flip-it card. Then we used two new sets of thinlits: 659111, Hello Summer and 659072, tags by Rachel Bright. In spite of the details, the precision cut is remarkable on these new dies! Of course the wax paper really helps a lot!


Repararam no pormenor e detalhe das antenas da borboleta? * Did you notice the detail on the Butterfly anthena's?

Tenham um excelente fim de semana e estejam atentos pois na segunda feira chega mais uma novidade ao blog da Tubo de Ensaio!!!!!

Have a great weekend and stay tuned on Monday because we have more news arriving to the blog!!!!!

P.S Se não sabe onde encontrar wax paper, envie-nos um email para scrapbookingwithtubo@gmail.com
Related Posts Plugin for WordPress, Blogger...