Mostrar mensagens com a etiqueta Paula Pascual. Mostrar todas as mensagens

terça-feira, 7 de maio de 2013

Spring Card by Paula Pascual


Com um pouco de atraso, aqui fica o lindíssimo projecto da Paula Pascual para este mês! Mesmo a tempo para celebrarmos a chegada da Primavera!

With a little delay, her is this month project by Paula Pascual! Just in time to celebrate the arrival of Spring!

"Eu adoro a Primavera e os dias quentes e ensolarados que trás. Por isso decidi fazer um delicioso cartão que reflectisse o espírito da Primavera com muitas flores."

"I love Spring and the warmer and sunny days that it brings. So I decided to make a pretty card that reflected the Spring feel with loads of flowers."

"Comecei por pegar num cartão com 6"x6" e desenhar com um lápis uma linha ondulada na metade superior do mesmo."

"I started by taking a 6 x 6" white card and draw a wavy line on the top half of the card using a pencil."


" Depois cortei pela linha com a ajuda de uma faca de corte. * Then  I used my craft knife to cut that line."


"Cortei também na dobra para remover o pedaço completamente. * I cut the the scoring line to remove the wave completely."


"Cortei um papel da linha Family Ties da Pebbles Inc. com a mesma medida. * I trimmed to size the Pebbles Inc. paper from the family Ties collection."


"Para isso coloquei o pedaço de cartão branco cortado e desenhei a lápis uma linha. * I placed the top wavy piece cut on top to draw the line with a pencil." 


"Depois cortei-o e colei-o na frente do cartão * Then I cut it and glue it to the front."


"Da linha de papéis Family Ties da Pebbles Inc, faz parte este delicioso Journaling pad (na foto da direita). Tem frases excelentes em Inglês mas também excelentes padrões na parte de trás de cada um, por isso pode ser utilizado de muitas maneiras. Gostei especialmente desta mensagem e encaixa perfeitamente no cortante mais pequeno do conjunto de Framelits Fancy Charms by Sizzix"

"Part of the Pebbles Inc Family ties collection is this lovely journaling pad (on the right photo). It has great sayings in english but also lovely pattern on the back so it can be used many ways. This message I really liked and it fit perfectly in smallest die from the Sizzix Fancy Charms."


"Também cortei um segundo banner de cardstock branco, com o segundo cortante mais pequeno. * I also die cut a white banner using the second smallest die from the set."


"De seguida cortei um conjunto de flores usando quer os framelits Bunch of  Flowers como o Flower Vases. * Then I die cut flowers using both Bunch of Flowers and the Flowers Vases Sizzix Framelits sets." 


"Deixei os cortantes no seu lugar de modo a colori-los através do cortante. *  I kept the dies in place so that I could colour them through the die."


"Isto cria um efeito de moldura branca à volta de toda a flor. Pensei que esta técnica não iria funcionar nos framelits, uma vez que a lâmina está muito próxima da borda interior mas um amigo disse-me que sim e resolvi experimentar e estou a adorar o resultado final!"

"This creates a lovely thin white edge all around the flower. This is a technique that I thought it wouldn't work on Framelits as the blade is right on the inner edge, but a friend told me that it would, and I am loving the look!"


"Fiz muitas outras flores utilizando outros cortantes dos mesmos sets. * I did a lot more flowers using more designs from those two sets."


"Coloquei-os no cartão um por um e colei-os na frente do mesmo. * I place them on the card and one by one I glued them to the front."


"Para finalizar o cartão, adicionei alguns cristais à mensagem e ao centro das flores e depois adicionei um papel com padrão ao interior do cartão, da mesma linha de papéis da Pebbles Inc."

"To finish of the card I added crystals to the message, the centres of the flowers and then add to the inside of the card some patterned paper from the same Pebbles Inc collection."


"Aqui está o cartão terminado! Com um zoom em baixo. Espero que tenham gostado deste projecto e que o experimentem em breve!"

"And here you have the finished card! With a close up bellow. I hope you enjoyed this project and that you will try it soon!"


" Até ao próximo mês! * Until next month!"

terça-feira, 2 de abril de 2013

Paula Pascual Mini Album


"Olá! Hoje gostava de partilhar com vocês como podemos utilizar os Framelits para decorar as bordas de um mini álbum."

"Hoy me gustaría compartir con vosotras la forma de usar los troqueles Framelits en los bordes de las hojas, para decorar un mini álbum sencillo."

"Today I would like to share how to use the Framelits on the edge to decorate a simple mini album."

"Neste projecto utilizei papéis da colecção Indie Chic da My Mind's Eye e os seguintes cortantes da Sizziz: Sizzix Framelits Die Set 5PK - Wrappers, Circle (658613); Sizzix Thinlits Die Set 4PK - Dotty & Flowers Edges (658583); and Thinlits Die Set 4PK - Hearts & Flowers Edges (658584)."

"Decidí usar para este proyecto papel My Minds Eye - Indie Chick, y los siguiente troqueles Sizzix: Sizzix Framelits Die Set 5PK - Wrappers, Circle (658613); Sizzix Thinlits Die Set 4PK - Dotty & Flowers Edges (658583); y Thinlits Die Set 4PK - Hearts & Flowers Edges (658584)"

"I did use for this project My Minds Eye papers - Indie Chick, and the following Sizzix dies: Sizzix Framelits Die Set 5PK - Wrappers, Circle (658613); Sizzix Thinlits Die Set 4PK - Dotty & Flowers Edges (658583); and Thinlits Die Set 4PK - Hearts & Flowers Edges (658584)."

"Os cortantes têm 6"de altura mas pode trabalha-los em contínuo. No entanto para um mini-álbum, 6" é perfeito. Coloquei os papéis em cima da mesa de forma a coordenar as diferentes cores. Depois cortei os papéis de modo a ficarem com 6"x12"."


"Los troqueles tienen 6" de alto, pero los podrá trabajar en una línea continua. Sin embargo, para un mini álbum de 6" es perfecto. Coloqué los papeles en cima de la mesa para poder ver los colores y  la forma como se conjugan. Entonces recorté los papeles en la medida de 6 x 12"."


"The dies are 6" tall, but you could work them in a continuos line. However for a mini album 6" is perfect. I place the papers on the table so I can see the colours how they look together. Then I just trimmed the papers  to measure 6" x 12"."

"Peguei no papel de cima e vinquei-o a 4" de uma das laterais e corteio-o na Big Shot. Coloquei a borda do cortante alinhada pela margem direita do cartão. Seguro o cortante com um post-it ou fita adesiva e corto."

"Cogí el papel de arriba y lo marqué a 4" del borde y lo troquelé. Coloqué el troquel alineando el borde derecho del borde con el borde derecho de la tarjeta. Lo fijé con fita adesiva y lo troquelé."

"I took the top paper and score it at 4" from one edge and die cut it. I place the frame lit aligning the right edge of the edge with the right edge of the card. I secure it with tape and die cut it."

"Depois fiz o mesmo com o papel vermelho das flores. Com todos estes cortantes, uma vez que é necessário colocá-los na big shot numa linha horizontal (paralelamente aos rolamentos) será provavelmente necessário passar o cortante várias vezes para ter a certeza que o corte ficou perfeito. É fácil verificar na parte de trás do cortante como está o corte."

"En seguida hice lo mismo con el papel rojo con flores. Va a necesitar colocar todos estos troqueles en una Big Shot, en una línea horizontal (paralela a los rodillos) y probablemente tendrá que pasarlos varias veces para asegurarse de que los corta totalmente. Es fácil verificar en la parte de atrás si la hendidura quedó completa."

"I then did the same with the red paper with the flowers. With all these dies becasue you will need to put them on the Big Shot on a horizontal line (in parallel to the rollers) you probably will need to go through several times through to make sure that it cuts trough. It is easy to check on the back to see if the indentation is complete."

"Depois de ter a certeza que o corte ficou perfeito, pode retirar o cortante gentilmente. Coloque o papel na tábua de vincar e utilizando o cartão de cima como medida vinque no local correcto a folha vermelha. Neste caso tinha de vincar a 5" do limite da folha."

"Después de saber que está correctamente cortado, retírelo suavemente. Colóquelo después en la tabla de marcar. Para asegurarse de que la posición de cada página está perfecta, coloque la página de arriba en el topo y use la tarjeta de arriba. Anote la distancia de que irá necesitar. En este caso, necesité marcar a 5" del borde."

"Once you know if has cut properly, you can gently remove it. Then place it on the scoring board. To make sure the placing of each page is perfect, place the top page on top and use the top card. Make a note of what distance you will need. In this case, I needed to score at 5" from the edge."


"Corte a última das folhas, repetindo as instruções de cima para vincar. Neste caso vinquei a 5 5/8"."

"Troquele el resto de las páginas e repita las instrucciones de arriba para marcar. En este caso he tenido que marcar la ultima tarjeta a 5 ⅝"."

"Die cut the last of the pages and repeat the above instructions to score. In this case I had to score the last card at 5 ⅝"."

"Juntei as folhas todas e cortei o excesso do lado direito."

"Los junté a todos y recorté el exceso en el lado derecho."

"I assembled them all together and trim off the excess on the right hand side."

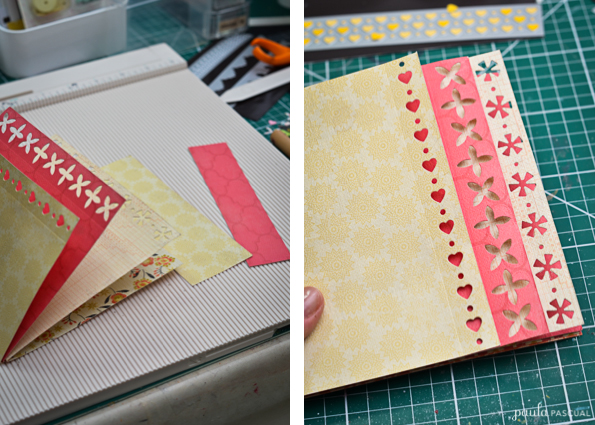
"Para unir as páginas umas às outras, utilize uma régua com medição e furos na linha da dobra. Centre a régua (3 polegadas para cada lado) e marque a 1" e 2" de cada um dos lados do centro."

"Para unir las páginas, coloqué la regla para perforar Tim Holtz en la línea marcada. Centré la regla (3" en cada lado) y perforé una marca a 1" y 2" del centro, en cada lado."

"To bind the pages together, place the Tim Holtz piercing ruler on the scored line. Centre the ruler (3" either side) and pierce or mark at 1" and 2" at both sides of the centre."

"Dobre todas as páginas e fure um meio círculo com um furador de mão (como crop-a-dile) de modo a que os furos fiquem como a imagem de cima."

"Doble todas las páginas y haga un semicírculo usando un perforador de mano. Así, los cuatro agujeros se parecerán con los de la foto de arriba."

"Fold all the pages and make half a circle using a handheld hole punch. So the four hole look like the picture above."

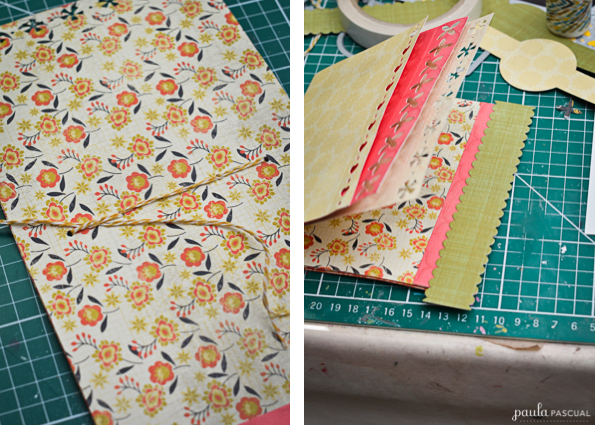
"Para passar o fio nas páginas, usei uma agulha de encadernação. Passe fio de pasteleiro (baking twine) de dentro para fora de uma ponta à outra, passando de um furo para o seguinte e assim sucessivamente."

"Para coser las páginas usé una aguja de encuadernación (de abertura ancha pero con punta roma). Cosa con la cinta Baking Twine del interior hasta el agujero más cercano y otra vez para fuera hasta el próximo y una vez más para dentro hacia el próximo. Entonces fuera para uno de los más cerca hacia el centro y para dentro para el siguiente."

"To thread the pages, I used a bookbinding needle (large aperture but rather blunt at the pricing end). Thread the Baking Twine from inside to the nearest hole and out again at the next, in again to further one. Then out of one of the closer to the centre and in at the next one."

"Por dentro deve ficar assim o que é basicamente como deve ficar por fora também. Dê um nó nas pontas para segurar. Agora está pronto a ser decorado."

"Por dentro debe parecerse como este de arriba que, más que nada, es como debe parecerse también el exterior. Haga un nudo para segurar las puntas. Ahora está lista para decorar."

"Inside should look like this above, which is pretty much how it should look outside as well. Make a knot to secure the ends. Now you are ready to decorate."

"Para a capa usei o cortante Circle Wrappers e imprimi o título com a minha impressora no papel da My Mind's Eye e recortei-o com o círculo mais pequeno- que mede 1 3/8"."

"Para la capa usé un Circle Wrapper. Imprimí el titulo usando mi ordenador y lo troquelé con los círculos más pequeños, que miden 1 ⅜"."

"For the cover I used the Circle Wrappers, I printed the title using my computer and printer and die cut with the smallest circle die - measuring 1 ⅜"."

"E estas são algumas das páginas interiores decoradas com fotos do meu gato, Wasabi!"

"Y estas son algunas de las páginas interiores, decoradas con fotos de mí gato, ¡Wasabi!"

"And these are some the inside pages decorated with photos of my cat, Wasabi!"


"Deixei algumas páginas em branco para adicionar mais texto e fotografias à medida que os anos vão passando".

"Dejé algunas páginas en blanco pues así podré adicionar más fotos y texto a lo largo del año."

"I left some pages blank so that I can add more text and photos as the year goes along."

"Espero que tenham gostado

"I hope you enjoyed this mini album. See you in the end of the month!

terça-feira, 26 de fevereiro de 2013

Hexagon card by Paula Pascual

"Para comemorar o facto de os cortantes da colecção Fresh Moments by Sizzix, desenhados por mim, já estarem nas lojas, pensei em fazer um projecto usando um dos sets, os Hexágonos (658609)! Gosto de cartões muito estruturados e usar cortantes é a maneira perfeita para o conseguir!"


"To celebrate that the Fresh Moments dies that I designed for Sizzix are arriving to the shops around, I thought I would a project using one of the sets, the Hexagons (658609) ! I like very structural cards and die cutting is a perfect way to achieve that."


"Comecei por cortar duas vezes o Hexagono maior, usando dois papéis contrastantes. Estou a usar aqui um conjunto de papéis da my Mind's Eye, da colecção Indie chic. Adoro papel texturado e este tem uma grossura ideal para fazer um cartão."

"I start by die cutting two large - the largest Hexagon die - using two contrasting papers. I am using here a range of papers from the My Minds Eye Indie Chick collection. I love that is textured and has a nice thickness, thick enough to make the blank card."

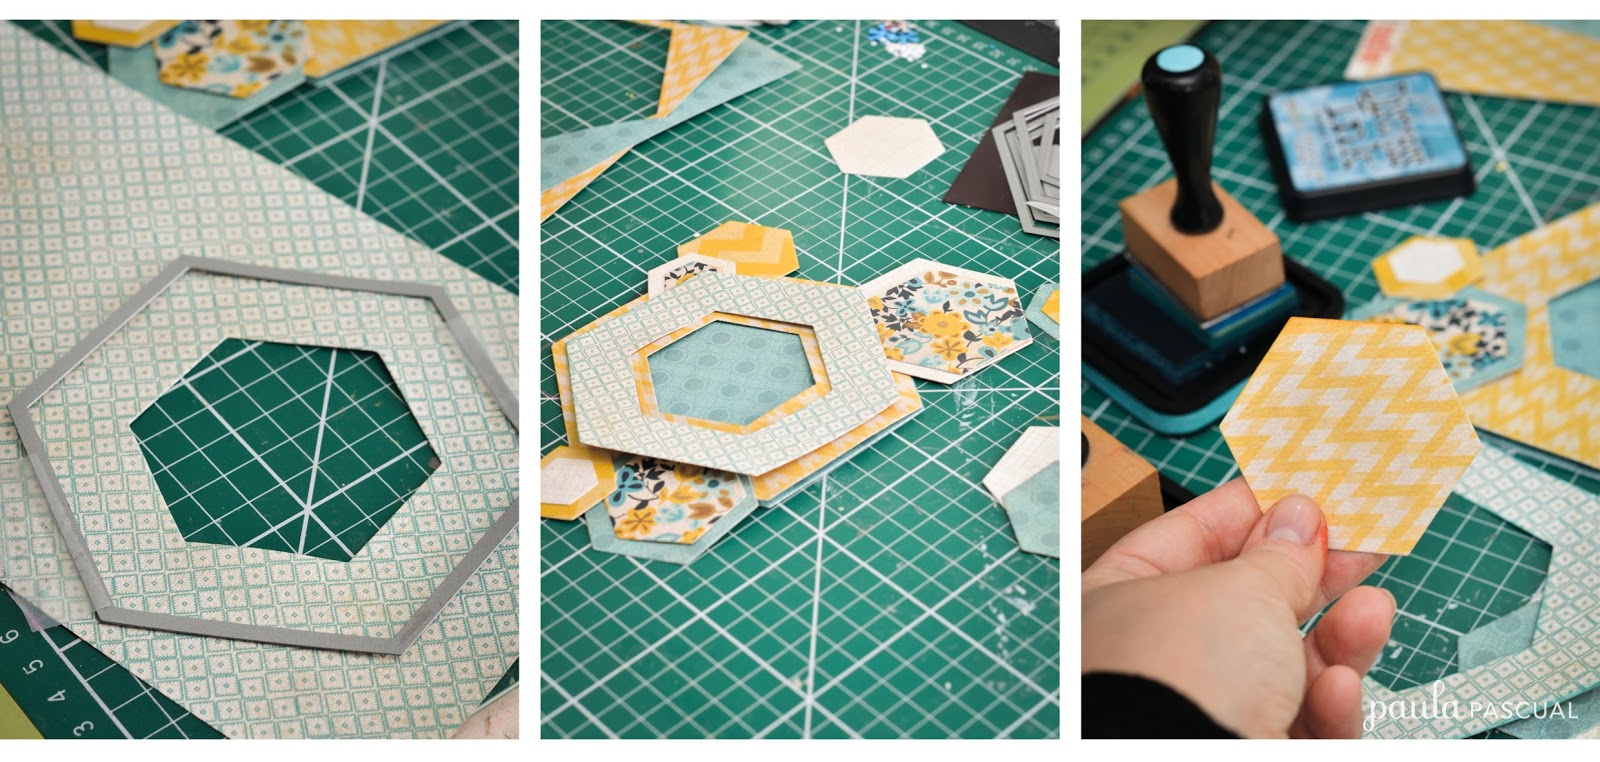
"Depois peguei naquele que escolhi para a frente do cartão e coloquei um hexágono mais pequeno no centro e segurei-o com post-it ou fita-cola de baixa adesão. Passei-o pela Big shot e consegui a abertura no meio."

"Then I took the one for the front of the card and place a smaller die in the centre and secure  with low tack tape, I run it through the Big Shot and I got the aperture in the centre."


"Para criar o cartão, usei o segundo maior hexágono e vinquei-o num canto, a cerca de 2 cm. isso irá criar uma dobra que aderi com PVA glue ao Hexágono com a abertura. Esta é uma maneira fácil de criar a base para um cartão, utilizando framelits com papel mais grosso".

"To create the folded card, I took the second large Hexagon and scored one corner at about 2cm or a bout 1" . That creates a flap in which I added Tacky glue to and then added it to the Hexagon with the aperture on. This is a quick way to create the base card using framelits with thicker card."


"Corte uma variedade de hexágonos mais pequenos, usando diferentes papéis da colecção. Esta é a melhor forma de ter a certeza de que os padrões e cores vão funcionar bem uns com os outros. Coloquei depois o cartão base no tapete de corte e brinquei um pouco com as formas, sobrepondo os diferentes tamanhos transformando-os em pequenas molduras dispostas à mesma distância."

"Die cut a variety of smaller Hexagons using several papers with different patterns from the same Indie Chick collection. This is the best way to make sure all the colours and patterns work well together. Then I place the base card on the cutting mat and play around with the shapes, layering them as the shapes all frame into each other at the same distance."


"Percebi depois que necessitava de algo mais para a frente, por isso cortei outra moldura usando o segundo maior hexágono e um outro grande para o centro, de modo a que o amarelo se visse de ambos os lados. Depois utilizei a distress ink da ranger em várias cores (broken china, wild honey e gathered twigs) para dar detalhe aos vários lados dos hexágonos. Colei-os usando ou almofadas 3D ou cola. Adicionei os botões, ataches e mensagem, todos da mesma colecção da My Mind's Eye."

"I realised that I needed something else over the front so I die cut another frame using the second largest Hexagon and a bigger one for the centre, that way the yellow showing through is the same in both sides. Then I used Ranger Distress inks - Broken China, Wild Honey and Gathered Twigs- to add details in all edges of the hexagons. I added all Hexagons using either foam pads or tacky glue. I added the buttons, brad (in the centre) and the message, all from the My Minds Eye Indie collection."


"E aqui está o cartão terminado! Espero que gostem e vemos-nos no próximo mês!"

"And here you have the finished card! I hope you like it and see you next month!"

terça-feira, 29 de janeiro de 2013

Moldura * Photo frame by ......

Bom dia a todos! É com muito gosto que hoje vos trazemos uma grande novidade: uma nova designer no blog. Estamos muito contentes de contar com a colaboração da Paula Pascual! Para todos os que trabalhem com a Sizzix este nome não é com certeza desconhecido e aqueles que estiveram presentes no Chocolate Quente XL 2012, tiveram a oportunidade de trabalhar com ela. É um encanto, não é?


Good morning everyone! It is with great pleasure that today we bring you a big news: a new designer on the blog. We are really happy to count with Paula Pascual from now on!!! For all of those that have a sizzix machine and dies this name is for sure no stranger! Don't you just love her new dies? Well we do and are really pleased to have her on our team!

"Estou muito entusiasmada por partilhar as minhas ideias com os seguidores do blog da Tubo de Ensaio! Hoje gostava de vos mostrar um projecto simples e rápido para decorar uma moldura".


"I am really excited about sharing my ideas with the readers of Tubo's blog! Today I would like to share a quick and easy project to adorn a photo frame".

Vai precisar de * You will need
Sizzix Big Shot die cutting machine
658289 Sizzix Framelits Die Set 6PK w/Stamps – Banners
658290 Sizzix Framelits Die Set 5PK w/Stamps - Butterflies #4
My Minds Eye: The Sweetest Thing, Honey collection – papéis, autocolantes, botões* papers, stickers, buttons.
Stix 2: almofadas 3D com 3 e 4 mm de espessura * foam pads in 3mm and 4mm thickness
Almofada para carimbos vermelha * Red ink pad
Moldura branca * White frame
"Começo por recortar nove "banners", usando o segundo cortante mais pequeno do conjunto de framelits: Escolhi a colecção da My Mind's Eye, the Sweetest Thing, o tema Honey. Coloquei os banners na moldura para ter a certeza que cabem".

"I start by die cutting nine banners using the second smallest banner from the Framelit set. I chose the Sweetest Thing Honey collection from My Minds Eye. I placed them on the frame to make sure they fit and to make sure of the distribution".

"Aderi todos os "banners" cuidadosamente, usando almofadas 3D da Stix 2 com alturas diferentes para lhes dar mais dimensão".

"I attached all the banners carefully using Stix 2 Foam pads in two different heights to add more dimension".

"Imprimi a fotografia e cortei-a usando o mesmo Framelit. I printed off the picture and then die cut using the same Framelit".


"Carimbei a Borboleta (do conjunto de Framelits Borboletas 4) e coloquei o cortante correspondente em cima, prendendo-o com fita cola de baixa adesão e cortei na big shot".

"I stamped the Butterfly (from the Butterflies 4 Framelits) and placed the matching Framelit. Secure it in place with low tack tape and die cut".


"Coloque a fotografia e a fotografia e adicione outros elementos da colecção para decorar a gosto".

"Attach the butterfly and the photo banner and then add any other details as embellishments".


"E aqui está o projecto terminado! Espero que gostem. Para o próximo mês voltarei novamente!"

"And this is the finished project! I hope you like it. Next month more to come!"

quinta-feira, 24 de janeiro de 2013

Fresh Moments

Hoje trazemos mais uma amostra do que está para chegar, desta vez com dois projectos feitos com a nova colecção de cortantes da Sizzix, a Fresh Moments, desenhada pela Paula Pascual e vindos directamente da própria Sizzix! Estão lindos e são muito fáceis de fazer! Os cortantes estarão disponíveis a partir da segunda semana de Fevereiro numa loja perto de si!

Today we bring you a new sneak peek of what is coming soon, this time with two projects made by Sizzix using their new line, Fresh Moments, designed by Paula Pascual. The projects are beautiful and they are very easy to do! The dies will be available from the second week of February at a store near you!

Little House


Vai precisar de * What you need:
655268 Sizzix Big Shot Machine
658607 Sizzix Framelits Die Set Intricate Flowers
658602 Sizzix Framelits Die Set Bunch of Flowers
658606 Sizzix Framelits Die Set Flower Vases
Casa de madeira * Wooden house frame
Papel Double dot * Double dot paper
Papel de seda * Tissue paper
Papel vegetal * Vellum
Carrinhos de linha de madeira * Wooden reels
Fitas * Ribbons
Cola * Adhesives
Tinta Branca * White paint

Como fazer * How to make:
1. Pinte a casa de madeira por fora com a tinta branca. Deixe secar completamente.
1. Paint the wooden house frame using white paint. Let it dry completely.

2. Corte várias camadas de papel de seda de uma mesma cor de uma só vez. Faça um corte até ao centro e enrola as pétalas para criar um botão central e use o outro conjunto de cortantes para fazer as pétalas que vai colocar à volta. Cole tudo com uma pistola de cola quente. Repita tantas vezes quantas flores quiser.
2. Die cut several layers of one single color tissue paper at a time. Make a cut to the center of each and roll the petals to create a bud, use the next set of die cut flowers to create the petals around. Attach it all together with a heat gun for instant grab, repeat that as many times as flowers you would like.

3. Corte os vasos usando o papel e o papel vegetal. Pegue no vaso azul, corte-o ao meio e cole-o na parte de trás do vaso de vegetal. Corte os ramos deste mesmo conjunto.
3. Die cut the vases using paper and vellum. Take the blue vase and trim it half way and attach it to the back of the vellum one. Die cut the branches from the same set.

4. Adicione fita aos carrinhos de linhas mais pequenos. Coloque os diferentes elementos na casa como gostar mais, com a ajuda de uma pistola de cola quente. Cole a fita de renda no topo e na prateleira do meio.
4. Add ribbon to the small wooden spools. Start arranging the elements on to the box and secure them in place with the help of a hot glue gun. Attach the lace to the top and middle shelf.

Hugs and Kisses

Vai precisar de * What you need:
655268 Sizzix Big Shot Machine
658610 Sizzix Framelits Die Set Rectangles 2
658612 Sizzix Framelits Die Set Sentiments Tags
658602 Sizzix Framelits Die Set Bunch of Flowers
658606 Sizzix Framelits Die Set Flower Vases
658605 Sizzix Framelits Die Set Doilies Lovely
Cartão branco * White Card
Papel double dot * Double Dot papers
Cartão branco para imprimir * Printable White card
Carimbo Paula Pascual * Message stamp: Paula Pascual, Filled With Flowers PPCSA6003

Como fazer * How to make:
1. Corte os rectângulos (framelits set 2), de dois tamanhos diferentes, do papel com padrão e do cartão branco para que se sobreponham e fiquem perfeitos alinhados no cartão A6 dobrado.
1. Die cut the rectangles (framelits set 2) out of patterned paper and white card so they mat and layer perfectly on the white A6 folded card.

2. Corte as etiquetas de diferentes papéis.Coloque-os então na frente do rectângulo branco usando cola ou almofadas 3D. Use as flores e os corações, de ambos os conjuntos para cortar diversos elementos decorativos e cole-os nas etiquetas. Carimbe a frase numa das etiquetas cortada de cartão branco e coloque-a no cartão.
2. Die cut the sentiment tags out of different patterned paper. Place then over the front of the white card and attach them. Use the flowers -from both sets- and hearts - from the doilies set- to die cut several elements and attach them to the tags. Stamp the message die cut using one of the sentiment tags dies and place it in the card.


quarta-feira, 14 de novembro de 2012

Isn't Paula great?

Temos a certeza que já ouviu falar da Paula Pascual. Esta talentosa designer natural de Mallorca, reside em Londres à muitos anos e daí vem a sua ligação à Sizzix. Recentemente desenhou um conjunto de cortantes que são uma delícia, como estes que se podem ver na imagem.
Para ganhar este prémio basta que, aqui no blog ou no facebook, até às 24h de dia 20 de Novembro, nos diga quantos cortantes (e ou texturas) tem a colecção desenhada pela Paula e qual destes cortantes é o seu preferido.
O vencedor será escolhido aleatoriamente e conhecido no dia 22 de Novembro. Boa sorte para todos!

segunda-feira, 14 de maio de 2012

Mini Cabinet pot


Conforme prometido, aqui fica o novo post da Paula Pascual sobre como fazer um cubo para colocar lápis ou canetas, utilizando o cortante da Sizzix Mini Cabinet Card (657206). Esperamos que gostem!

MINI CABINET PEN POT

Saturday, 12 May, 2012 

Today I am sharing how to make the little pen pot using the Mini Cabinet Card die.


As the Mini Cabinet Card is a Magnetic Movers and Shapers die you will need either the Base Tray or the Vintage Cabinet Card to die cut it. Both Base and Vintage Cabinet card dies are designed to be used in combination with the magnetic movers and shapers dies, they just add the right amount of thickness for the magnetic dies to work. Remember the magnetic dies have exactly the same power of cutting as any other Bigz dies but with the added value of being able to cut within a shape in one go.


Take a piece of double sided patterned paper that measures 6 x 12" approximately.
Then score it at 2 1/2", 5", 7 1/2" and 10".


Once folded it should look like this, all the scored line parallel to each other. I like to use My Mind's eye papers for projects like this one as they offer just the right amount of thickness for scoring, folding and gluing. 


To die cut it in perfect place (centred) secure it with low tack tape. It is important to make sure that the scored lines are in parallel to the edges of the die.


Once die cut, it should looked like this.


Trim off the rounded tab at one of the ends.


Score all the way down at the bottom of the rounded tabs.


Score all the way where the pips are, just about 1/4".


Make a V cuts where ever needed for a perfect fold.


Fold all scoring lines.

And glue together by glueing one end (the one with no rounded top) inside the other end.


Cut two pieces of 2 1/2" x 2 1/2" for the bottom of the pot.


Attach one of the bottoms to the pot from outside and let it dry.


Position the other square inside the pot. Trim off a tiny fraction if necessary.


Glue the side flaps for a more neat finish.


And here you have both boxes together.

I hope you enjoyed it!

Related Posts Plugin for WordPress, Blogger...