Mostrar mensagens com a etiqueta Sweet afternoon. Mostrar todas as mensagens

terça-feira, 2 de outubro de 2012

Sweet Afternoon album


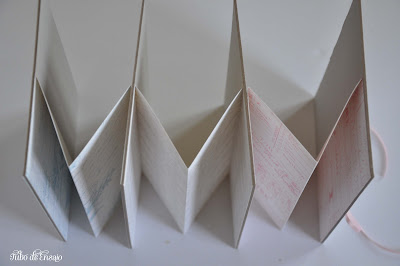
Para um Scrapbooker, não há nada mais gratificante do que fazer um mini álbum. Na sua essência este não é mais do que transformar um conjunto de fotografias num livro, numa história! Por isso hoje aqui fica um álbum em acordeão muito original que podem fazer com qualquer colecção de papel. Neste caso usamos a colecção Sweet afternoon da Teresa Collins.

For a Scrapbooker, there is nothing more gratifying then to make a mini album. It is nothing more then transforming a set of photographs into a book, a story! So today we decided to show you how you can make an original Accordion album with any paper line. We used Teresa Collins Designs Sweet afternoon papers.

Vai precisar de:
- 4 capas de cartão com 6"x9"
- 6 folhas cortadas com a medidas de 12"x9"
- 1 folha cortada em duas peças com 6"x9"
- Fita
- Material para decorar

You will need:
- 4 chipboard covers with 6"x9"
- 6 sheets of paper with 12"x9"
- 1 sheet of paper cut in two pieces of 6"x9"
- Ribbon
- Paper and accessories for decorating


Pegue em duas peças de cartão. Estas serão a capa e a contra-capa do álbum. Cole uma das peças com 6”x9” numa das peças de cartão. Corte uma fita em duas peças com 30 cm cada. Na outra peça de cartão, a cerca de 4" da parte superior, cole de cada um dos lados com cola de contacto transparente, um pedaço desta fita. Depois de a fita estar colada, cole com cola PVA a outra peça de papel com 6”x9” por cima das fita. Terá assim a capa e contra capa forradas.

Take two chipboard covers. On one of them, using PVA glue, stick one of the papers measuring 6"x9". Cut the ribbon into two pieces measuring 30 cm each. On the other chipboard cover, glue the ribbon (use contact glue) 4" from the top, on both sides of the cover. Glue the other piece of 6"x9" paper on top of the ribbon. You will have the cover and back cover ready.


Pegue de seguida nas 6 folhas que tem com 9”x12” e na Scor-pal. Uma de cada vez divida-as em 4 partes iguais com 3” cada, passando a dobradeira na marca de 3”, 6” e 9” na sua tábua de vincar. De seguida, dobre as folhas pelos vincos, em harmónio. Cada folha irá ter uma face à vista e outra que ficará colada ao cartão. Escolha a face que quer de cada folha para ficar visível e dobre-a em W.

Using the Scor-pal, divide each one of the 6 papers measuring 12"x9" in four equal parts with 3" each. To achieve that, score them with your bone folder at the marks of 3", 6" and 9". After that choose the side of the paper you want for the front, and fold all the 6 papers forming a W.

Vamos de seguida começar a montar o miolo do álbum. O procedimento repete-se para cada uma das folhas vincadas que tem. Começamos com o cartão da capa (onde colamos uma das folhas com 6”x9”), uma das folhas vincadas e um cartão liso.

Now we need to start assembling the core of the album. You will repeat this operation for every paper you have. Begin with the cover (the piece of chipboard with the paper), one of the scored papers and one plain chipboard cover.


Deite cola na parte de trás do primeiro vinco da folha e cole-a na parte de trás da capa, alinhando a extremidade do papel com a extremidade do cartão.


Put some PVA glue on the back of the paper, just on the first score and attach it to the back of the cover, aligning the paper with the card.


Pegue depois num outro cartão e dando cola na parte de trás do último vinco da folha, cole esta no cartão, não se esquecendo de alinhar as extremidades.

Using another chipboard cover and applying glue to the back of the last score on the paper, attach the paper to the cover, aligning the edges.


De seguida pegue numa outra folha de papel. Ponha cola na parte de trás do primeiro vinco desta e cole-a nas costas do cartão que acabou de usar. Coloque em seguida cola no último vinco deste papel e cole-o no cartão que sobra. Não se esqueça de alinhar bem o papel! 

Using another piece of paper, repeat the same thing as before: apply glue to the back of the paper, on the firts score and attach it to the chipboard you just used. Then do the same thing with the last score on the paper and the left chipboard piece.


Vamos repetir o mesmo processo para a terceira folha. O último vinco desta peça vai colar à parte de trás da contra-capa (peça de cartão com as fitas). Ficará com um harmónio de cartão e papel.

Repeat the process for a third piece of paper. The last score on this one will be attached to the back of the back cover (the chipboard piece with the ribbons). You will have an accordion with chipboard and paper.


Vamos agora fazer a outra parte do álbum. Usando as três folhas que sobram, repete-se os processos acima descritos até todos os cartões estarem todos forrados . Pode depois escurecer cada folha do álbum e as capas com um Distress Ink pad (por exemplo cor pumice stone). O álbum está agora pronto a ser decorado!

Let's do the back of the album now. Using the three papers left, repeat the above process until all the chipboard covers are lined with paper. You can ink the edges with Distress ink pad (we used Pumice stone). The album is now ready to be decorated!

 
Divirtam-se e queremos ver fotografias dos vossos trabalhos!

Have fun and we want to see photographs of your projects!

terça-feira, 25 de setembro de 2012

Sweet afternoon álbum


Olá Scrapbookers! Hoje é novamente dia de conhecerem o trabalho que a Carla Pimentel fez especialmente para a Tubo de Ensaio. Com os papéis Sweet Afternoon da Teresa Collins Designs, surgiu este delicioso mini álbum. Esperamos que gostem!

Hello Scrapbookers! Today it's time you got to know Carla's Pimentel designs for Tubo de Ensaio. With Teresa Collins designs papers from Sweet Afternoon, she made this delicious mini album. We hope you like it as much as we do!

Como fazer o álbum
Comece por forrar as capas de cartão no exterior e na contracapa com papéis cortados à medida e pinte os lados visíveis do cartão com tinta distress spun sugar. Cole uma tira com fitas de tecido e a flor na capa. Decore a parte superior com uma moldura, escreva os seus pensamentos e cole uma coroa da colecção “adorno” sobre a mesma.

How to make the album
Start by cutting your papers to match the size of the chipboard  covers and ink the edges with distress ink pad Spun sugar. With double sided tape, glue a piece of ribbon and the flowers to the cover. Decorate the top half with a frame and journal your thoughts into it. Glue a crown for decoration purposes to the top.


A primeira folha mede 14x21,5cm e está coberta por uma folha de acetato cortado com a mesma medida e decorado com Rub-Ons e pedras coloridas. Em ambas as folhas foram arredondados os bordos externos com a Crop A Dile.

The first page measures 14x21,5 cm and it is covered with an acetate piece of paper cut to measure and decorated with a rub-on and colored rhinestones. Both pages have rounded corners made using crop a dile.

Por trás da primeira folha de papel (foto abaixo) foi feito um bolso colado inferiormente e que está decorado com uma pequena renda e um dos recortes da colecção, que foi coberto com crackle accents. A etiqueta que está dentro do bolso é um rectângulo com 9x12cm arredondada nos 4 cantos.

Behind the first page (photo below) there is a pocket made by gluing on the bottom a piece of paper that was then decorated with a bit of lace and one of the decorative cuts from the line, covered afterwards with crackle accents. The tag inside it is a rectangle with 9x12 cm, with the 4 corners rounded.


A segunda folha mede mede 30x21,5cm. Foi dobrada a 13cm do exterior e este lado decorado com o “punch” da Marta Stewart. Foram aplicados alguns dos “die cuts” da colecção Sweet Afternoon e Everyday moments.

The second page measures 30x21,5 cm. It was folded 13 cm from the edge and that side was punched with a Martha Stewart edger punch. The decorations used are decorations from Sweet afternoon and Everyday moments.
 A terceira folha foi cortada com a forma de etiqueta, mede 12,5 por 19,5cm. O orifício está decorado com Rub-Ons em ambos os lados.

The third page is tag and it measures 12,5x19,5 cm. The hole at the top is decorated with rub-ons on both sides.

A quarta e quinta folhas foram cortadas a partir da mesma folha de papel, inicialmente com as medidas de 30x21,5cm. Esta foi dividida ao meio, obtendo-se duas folhas com 15x21,5cm. No lado maior ambas foram cortadas com o cortante On the edge file tab (656629) e foram decoradas com pedras e com um naperon branco coberto com uma flor recortada da coleção Everyday moments.

The next two pages were both cut from the same paper (30x21,5cm) that was divided in half, each one measuring 15x21,5 cm. On the bigger side they were cut using sizzix die On the edge, File tab (656629) and decortaed with rhinestones and a white doily, covered with a flower from Everyday Moments paper line.

A sexta folha mede 17x21,5cm. Na parte inferior foi criado um bolso com o cortante  On the edge Distressed doily (657496), decorado com um Rub-On. Na parte de cima foi aplicado um recorte feito com o próprio nome da colecção que se encontra em todas as folhas da mesma. A etiqueta mede 13x15cm, foi criada com dois papeis da colecção e foi decorada com tule.

The sixth page measures 17x21,5 cm. On the bottom there is a pocket made by using the On the edge die Distressed doily (657496), decorated with a rub-on. At the top the decoration was made by using a piece of paper with the name of the line that you can find on every piece of paper. The tag measures 13x15 cm and it was made from two papers of the line and decorated with ribbon.


A sétima folha é uma pequena bandeira com 14x9,5cm, decorada com Rub-ons e tinta distress spun sugar.

The next page is a small flag measuring 14x9,5 cm and decorated with rub-ons and distress ink Spun sugar.


A oitava folha mede 17,5x21,5cm. No exterior foi aplicada uma tira com 9x21,5cm, decorada num dos extremos com o punch e colada superiormente, inferiormente e externamente para fazer um bolso, com a abertura voltada para o interior do álbum. Está decorada com Rub-Ons e com umas tiras de papel em forma de bandeiras, presas com as “Sweet afternoon brads” (estas devem ser aplicadas antes de colar o bolso).

The eighth page measures 17,5x21,5 cm. On the outside there is a strip of paper, decorated with a punch on one end and glued at the top and bottom to create a pocket, with the opening left to the inside of the album. It is decorated with rub-ons and strips of paper turned into small flags, attached with brads (these most be applied before you glue the pocket).


A última página resulta do corte de uma folha de papel com o cortante da  Album, Scallop Rectangle #2 (656698)  e são os furos desta folha que vão servir de guia para a marcação dos furos das restantes folhas e da capa do álbum. Colocar as argolas e decorar o álbum a gosto.

The last page was made using Sizzix die Album, scallop rectangle #2 (656698) and the holes on this piece of paper will be te guides to make the holes on all the pages of the album as well as the covers. Place the rings and decorate as you like.

Vai precisar de
Cartão cinzento prensado com 1,5mm – cortar 2x 17,50x23cm
Papeis da colecção Sweet Afternoon da Teresa Collins, Decorative cuts e brads
Flor branca da Teresa Collins – Fabrications Flower
Papel e decorative cuts da colecção Everyday Moments
Papel Bazzil na cor rosa
Rub Ons
Folha de acetato
Naperon pequeno de papel branco
Coroa da coleção adornos Idea-ology Tim Holtz
Distress ink nas cores: spun sugar e vintage photo
Glossy  e crackle accents da Ranger
Crop A Dile: furador e arredondador de cantos
Punch da Martha Stewart: French scroll punch
Cortantes da sizzix: 656629, 657496 e 656698
Fitas de tecido e tules nas cores branco e rosa
2 Argolas de metal
Fita cola de dupla face
Cola PVA.
Cisalha e X-Ato


You are going to need
Chipboard with 1,5mm – cut 2x 17,5x23cm
Papers from Sweet Afternoon by Teresa Collins, Decorative cuts and brads
White flower from Teresa Collins – Fabrications Flower
Paper and decorative cuts from Everyday Moments
Pink bazzil paper
Rub Ons 
Acetate papers
Small white doily
Crown from Idea-ology- Tim Holtz
Distress ink pads: spun sugar and vintage photo
Glossy and crackle accents by Ranger
Crop A Dile: punch and corner rounder
Martha Stewart: French scroll punch
Sizzix dies: 656629, 657496 and 656698
White and pink ribbon
2 metal rings
Double sided tape
PVA glue
Trimmer and cutting knife and board


Related Posts Plugin for WordPress, Blogger...