O passatempo desta semana contempla a nova colecção da Teresa Collins Designs, que muitos tiveram a oportunidade de assistir à estreia em Portugal no passado dia 27 de Abril, no Chocolate Quente XL. É uma vez mais uma colecção linda e que dá para muitos e diversos trabalhos!
Para ganhar este prémio terá de, no blog ou no facebook e até dia 7 de Maio, deixar-nos ficar o seu comentário, dizendo-nos onde gostaria de passar as suas férias de verão....e o céu é o limite!!! No dia 9 de Maio, anunciaremos o vencedor! Boa sorte para todos!
Mostrar mensagens com a etiqueta Teresa Collins Designs. Mostrar todas as mensagens
quinta-feira, 2 de maio de 2013
sexta-feira, 15 de março de 2013
Teresa Collins by Keisha Campbell
Hoje trazemos vários projectos da designer Keisha Campbell, um dos membros da Design Team da Teresa Collins! Simples mas muito bonitos! Mãos à obra?
Hola! Hoy tenemos en el blog varios proyectos de Keisha campbell, una de las designers de la empresa Teresa Colins Designs! Simples más bonito! Vamos a trabajar?
Today we bring you severaç projects by Keisha Campbell, one of the members of Teresa collins Design Team. Beautifully simple! Let's get to work?
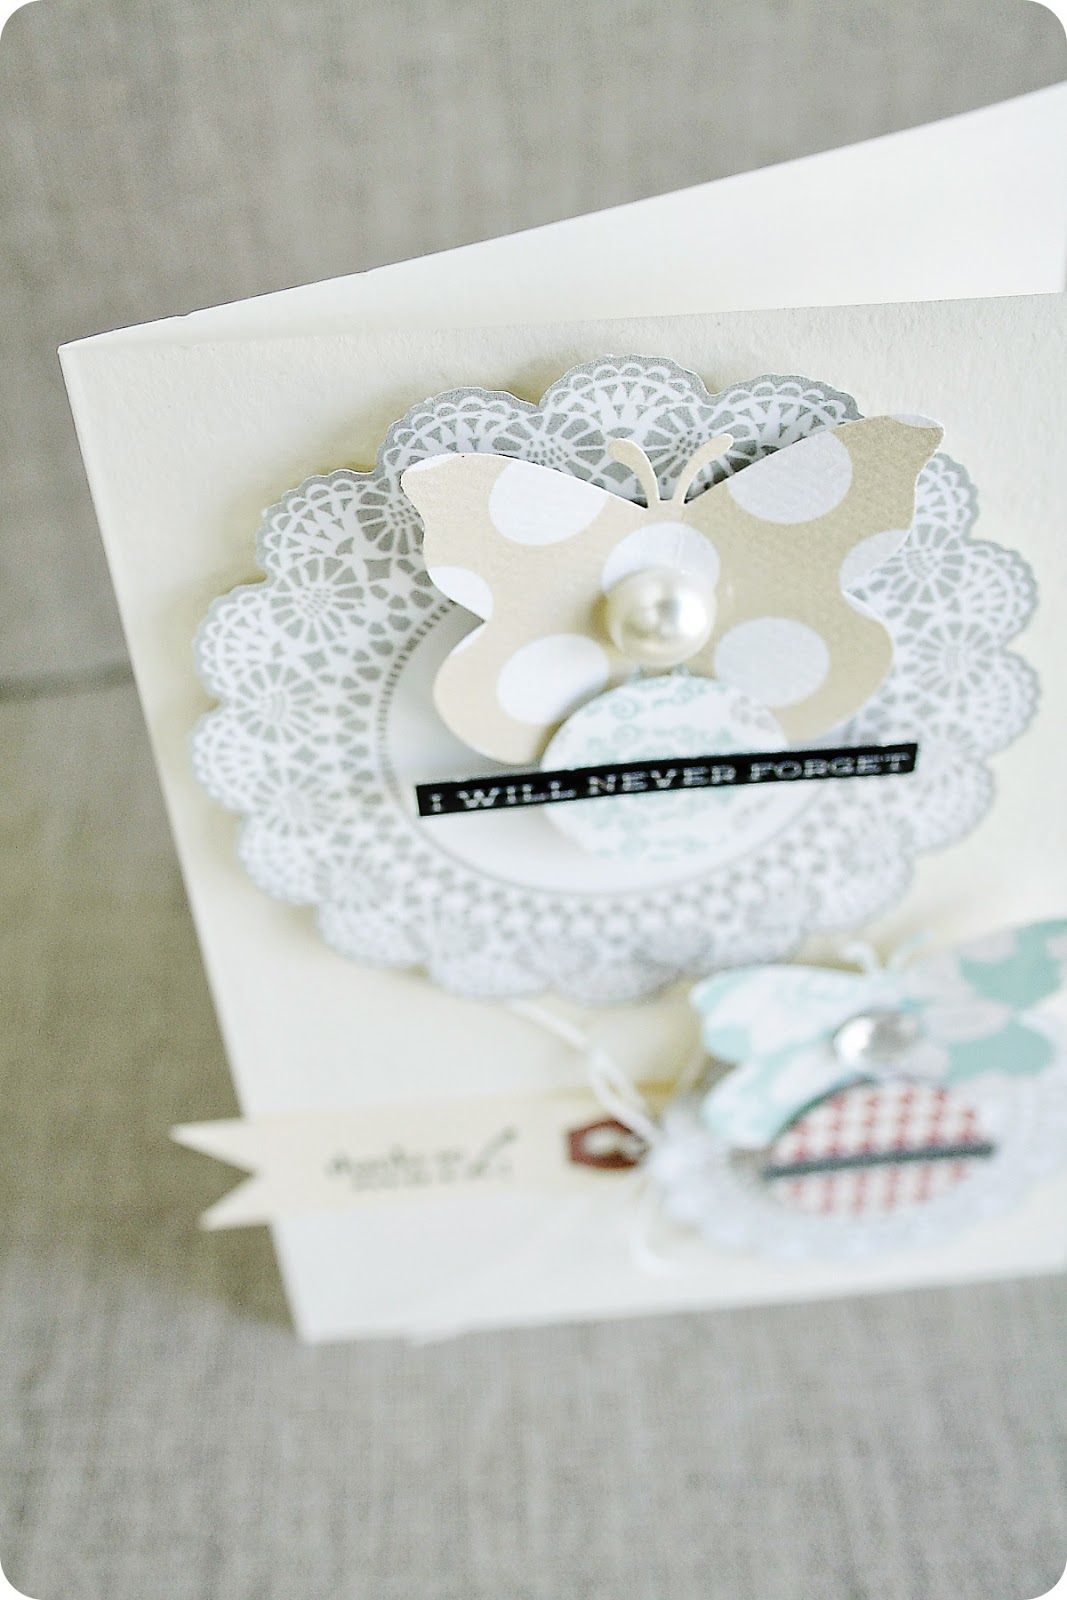
Cartão Muito Obrigado- tamanho 5"x7"
1. Utilizando esponjas 3D e o die-cut-sheet da colecção Memories, unir os círculos grandes à base do cartão.
2. Usando as mesmas esponjas, aplicar os círculos pequenos em cima dos círculos grandes.
3. Cole de seguida as tiras com as frases pequenas por cima dos círculos pequenos.
4. Usando um perfurador, corte duas borboletas de diferentes papéis da colecção e coloque-as ligeiramente a cima de cada círculo.
5. Adicione umas pequenas pérolas no centro das borboletas e o pequeno cartão a dizer Muito Obrigada!
Tarjeta Muchas Gracias- Tamaño 5"x7"
1.Una el circulo más grande (de la hoja ya cortada de la colección Memories) a la tarjeta, usando tres esponjas 3d.
2. Después una los círculos más pequeños a los más grandes con otras 3 esponjas 3d.
3.En seguida pegue las pegatinas con las frases escritas en los círculos más pequeños.
4.Usando una troqueladora, corte dos mariposas en papel con estampados distintos y colóquelas ligeramente por detrás de los círculos pequeños
5.Coloque piedras decorativas en el centro de las mariposas
Thanks so much card- Size 5"x7"
1. Using 3d pop dots I added the larger circle stickers to the card
2. I then added the smaller circle stickers onto of the larger circles with more 3d pop dots
3. Then stick the sentiment stickers over the smaller circles
4. Using a punch-punch two butterflies from different pattern papers and slip them slightly behind the smaller circle stickers
5. Add gems to the center of the butterflies.
Cartão Remember- tamanho 5 1/2"x6"
1. Corte o papel escolhido da colecção memories com 11"x6", dobrando-o depois ao meio.
2. Corte três borboletas de um outro papel e cole um botão no centro de cada borboleta.
3. Carimbe a etiqueta e aplique no cartão!
Tarjeta Recuérdate- Tamaño 5,5”x6”
1.Corte papel estampado con el tamaño 11"x6" e dobrarlo al medio
2.Recorte tres mariposas y añádalas a la tarjeta
3.Pegue botones en el centro de las mariposas
4.Estampe la etiqueta y aplíquela en la tarjeta
Remember card- Size 5 1/2"x6"
1. Cut pattern paper to size 5.5x6
2. Punch three butterflies and add to card
3. Glue buttons to center of butterflies
4. Stamp tag & apply to card
Layout I Love you Much!
1. Corte duas tiras de papel com 3"x5" de dois papéis diferentes da colecção Memories. Corte uma outra tira com 3"x6".
2. Aplique as tiras num papel com 12"x12", com a tira mais larga no centro. Adicione as fotos no topo das tiras mais pequenas.
3. Adicione de seguida um dos envelopes pré cortados da colecção no topo da tira mais larga. Coloque uma etiqueta dentro do envelope e cole uma flor com um botão.
4. Cole a guirlanda a atravessar o layout. Imprima o journaling e adicione ao topo do layout. Perfure uns furos de um dos lados e adicione ataches.
Página Te Quiero Mucho
1.Corte dos tiras de 3"x5"de dos papeles con distintos estampados
2.Corte una tira de 3"x6" también de papel estampado
3.Aplique las tiras en un papel estampado de 12"x12", con la tira más grande en el centro
4.Ponga fotos a la parte superior de las tiras más pequeñas
5.Añada entonces el sobre troquelado en la parte superior de la tira más larga
6.Coloque las etiquetas en el sobre y pegue una flor con un botón
7.Pegue la guirnalda a la página
8.Imprima el "journaling" y añádalo a la parte superior de la página
9.Haga unos agujeros en el extremo derecho de la tira de "journaling" para añadir remaches
I Love You Much layout
1. Cut two 3"x5" strips from two different pattern papers from Memories paper line. Cut one 3"x6" strip of pattern paper from the same line.
2. Apply strips to 12x12 pattern paper-with the larger strip in the center. Add photos to the top of the smaller strips.
3. Then add the diecut envelope to the top of the largest strip. Slip tag into envelope & glue flower with button
4. Glue garland to page. Print journaling and add to top of layout. Punch holes to right end of journaling strip to add brads.
Layout Pure Happiness
1. Usando 3 envelopes da colecção Stationary Noted, adicione-os ao papel. Coloque duas fotografias no envelope maior e adicioe uma etiqueta.
2. Coloque uma fotografia no envelope mais pequenoe e adicione uma etiqueta com Journaling no envelope mais pequeno.
3. Cole as flores pré cortadas da linha no canto do envelope mais pequeno.
Página Pura Felicidad
1.Usando 3 sobres Stationary Noted, añádalos al papel estampado
2.Insiera dos fotos en el sobre más grande y también una etiqueta
3.Introduzca una foto en el sobre pequeño
4.Inserte una etiqueta de periódico en el último sobre
5.Pegue la flor troquelada en la esquina superior derecha del sobre más pequeño.
Pure Happiness layout
1. Using 3 of the Stationary Noted envelopes-add to pattern paper. Tuck two photos into the largest envelope and a tag.
2. Slide one photo into a small envelope. Add a journaling tag into the last envelope.
3. Glue diecut flower to the corner of small bottom envelope.
Hola! Hoy tenemos en el blog varios proyectos de Keisha campbell, una de las designers de la empresa Teresa Colins Designs! Simples más bonito! Vamos a trabajar?
Today we bring you severaç projects by Keisha Campbell, one of the members of Teresa collins Design Team. Beautifully simple! Let's get to work?
1. Utilizando esponjas 3D e o die-cut-sheet da colecção Memories, unir os círculos grandes à base do cartão.
2. Usando as mesmas esponjas, aplicar os círculos pequenos em cima dos círculos grandes.
3. Cole de seguida as tiras com as frases pequenas por cima dos círculos pequenos.
4. Usando um perfurador, corte duas borboletas de diferentes papéis da colecção e coloque-as ligeiramente a cima de cada círculo.
5. Adicione umas pequenas pérolas no centro das borboletas e o pequeno cartão a dizer Muito Obrigada!
Tarjeta Muchas Gracias- Tamaño 5"x7"
1.Una el circulo más grande (de la hoja ya cortada de la colección Memories) a la tarjeta, usando tres esponjas 3d.
2. Después una los círculos más pequeños a los más grandes con otras 3 esponjas 3d.
3.En seguida pegue las pegatinas con las frases escritas en los círculos más pequeños.
4.Usando una troqueladora, corte dos mariposas en papel con estampados distintos y colóquelas ligeramente por detrás de los círculos pequeños
5.Coloque piedras decorativas en el centro de las mariposas
1. Using 3d pop dots I added the larger circle stickers to the card
2. I then added the smaller circle stickers onto of the larger circles with more 3d pop dots
3. Then stick the sentiment stickers over the smaller circles
4. Using a punch-punch two butterflies from different pattern papers and slip them slightly behind the smaller circle stickers
5. Add gems to the center of the butterflies.
1. Corte o papel escolhido da colecção memories com 11"x6", dobrando-o depois ao meio.
2. Corte três borboletas de um outro papel e cole um botão no centro de cada borboleta.
3. Carimbe a etiqueta e aplique no cartão!
Tarjeta Recuérdate- Tamaño 5,5”x6”
1.Corte papel estampado con el tamaño 11"x6" e dobrarlo al medio
2.Recorte tres mariposas y añádalas a la tarjeta
3.Pegue botones en el centro de las mariposas
4.Estampe la etiqueta y aplíquela en la tarjeta
Remember card- Size 5 1/2"x6"
1. Cut pattern paper to size 5.5x6
2. Punch three butterflies and add to card
3. Glue buttons to center of butterflies
4. Stamp tag & apply to card
1. Corte duas tiras de papel com 3"x5" de dois papéis diferentes da colecção Memories. Corte uma outra tira com 3"x6".
2. Aplique as tiras num papel com 12"x12", com a tira mais larga no centro. Adicione as fotos no topo das tiras mais pequenas.
3. Adicione de seguida um dos envelopes pré cortados da colecção no topo da tira mais larga. Coloque uma etiqueta dentro do envelope e cole uma flor com um botão.
4. Cole a guirlanda a atravessar o layout. Imprima o journaling e adicione ao topo do layout. Perfure uns furos de um dos lados e adicione ataches.
Página Te Quiero Mucho
1.Corte dos tiras de 3"x5"de dos papeles con distintos estampados
2.Corte una tira de 3"x6" también de papel estampado
3.Aplique las tiras en un papel estampado de 12"x12", con la tira más grande en el centro
4.Ponga fotos a la parte superior de las tiras más pequeñas
5.Añada entonces el sobre troquelado en la parte superior de la tira más larga
6.Coloque las etiquetas en el sobre y pegue una flor con un botón
7.Pegue la guirnalda a la página
8.Imprima el "journaling" y añádalo a la parte superior de la página
9.Haga unos agujeros en el extremo derecho de la tira de "journaling" para añadir remaches
I Love You Much layout
1. Cut two 3"x5" strips from two different pattern papers from Memories paper line. Cut one 3"x6" strip of pattern paper from the same line.
2. Apply strips to 12x12 pattern paper-with the larger strip in the center. Add photos to the top of the smaller strips.
3. Then add the diecut envelope to the top of the largest strip. Slip tag into envelope & glue flower with button
4. Glue garland to page. Print journaling and add to top of layout. Punch holes to right end of journaling strip to add brads.
1. Usando 3 envelopes da colecção Stationary Noted, adicione-os ao papel. Coloque duas fotografias no envelope maior e adicioe uma etiqueta.
2. Coloque uma fotografia no envelope mais pequenoe e adicione uma etiqueta com Journaling no envelope mais pequeno.
3. Cole as flores pré cortadas da linha no canto do envelope mais pequeno.
Página Pura Felicidad
1.Usando 3 sobres Stationary Noted, añádalos al papel estampado
2.Insiera dos fotos en el sobre más grande y también una etiqueta
3.Introduzca una foto en el sobre pequeño
4.Inserte una etiqueta de periódico en el último sobre
5.Pegue la flor troquelada en la esquina superior derecha del sobre más pequeño.
Pure Happiness layout
1. Using 3 of the Stationary Noted envelopes-add to pattern paper. Tuck two photos into the largest envelope and a tag.
2. Slide one photo into a small envelope. Add a journaling tag into the last envelope.
3. Glue diecut flower to the corner of small bottom envelope.
Vemo-nos amanhã!!!! * See you all tomorrow* Vemo-nos manana
terça-feira, 19 de fevereiro de 2013
Just Monumental Layout
Hi, hi, hoje demos as voltas aos posts no blog e trazemos um layout de uma das designers da Teresa Collins Designs, a Stacey Michaud. ESte layout usa a colecção Far & Away desta marca!
Hi, hi, we twisted the posts a little here on the blog and so we bring you a project by one of the design team members at Teresa Collins Designs, Stacey Michaud. She used Far & Away line to make this lovely layout!
Tamanho do Layout: 17x11 (8,5x11 dupla página) * Layout Size: 17X 11 (8.5X 11 double page)
1. "Comece por uma base neutra. Coloque uma tira das etiquetas, lado B, com 0,75" de largura no topo das duas páginas para lhes dar consistência".
1. "Start with a neutral base. I used the Sports Edition 2 graph paper. Place a strip of the Labels, Side B sized at 0.75” in width along the top of both pages. This adds consistency".
2. "Corte o mapa do Norte da América do papel dos mapas. Coloque-as no topo superior esquerdo do layout a cerca de 6,5 cm do lado esquerdo da página. Adicione os enamel dots ao local que pretende ou então deixe-o de fora".
2. "Cut the map of North America from the Map paper. Place it along the top of the left hand side of the layout, about 2.5” from the left hand side of the page. Add the enamel dot to the pertinent location you are recording or leave it off".
3. "Coloque os banners do chipboard sheet ao longo do lado esquerdo do mapa. Coloque a peça de chipboard que diz Remember no banner para lhe dar dimensão. Corte os notecards, lado B em dois rectângulos. Um com 7x2,5" para o lado esquerdo e um com 8,5x2,5. Coloque o mais pequeno na página a 2,75" do fundo e alinhada do lado direito. Coloque a peça de 8,5"x2,5" na página a 2,75" do fundo, passando de um lado para o outro."
3. "Layer the banners from the Chipboard sheet along the left hand side of the map. Place the Remember chipboard piece on the tan banner to make it dimensional.
Cut the Notecards, Side B into two rectangles. One sized 7 X 2.5” for the left hand side and one sized at 8.5 X 2.5”. Place the one sized 7 X 2.5” on the page 2.75” from the bottom and lined up to the right hand side. Place the one sized 8.5 X 2.5” on the page 2.75” from the bottom, spanning from side to side".
4. "Adicione a Collage, o lado B das tiras . Um com 7x0,5" para o lado esquerdo e para o outro lado um com 8,5x0,5". Coloque o que tem 7x0,5" na página ao longo do topo do papel notecard. Coloque o de tamanho 8,5x0,5" ao longo do papel notecards paper, espalhando ao longo da página. Repita com as tiras Ephemera usando as mesmas medidas e seguindo os meus passos que fez até agora".
4. "Add the Collage, Side B strips. One sized 7 X 0.5” for the left hand side and one sized at 8.5 X 0.5”. Place the one sized 7 X 0.5” on the page along the top of the dotted Notecards paper. Place the one sized 8.5 X 0.5” on the along the top of the dotted Notecards paper, spanning across the page. Repeat with the Ephemera stripe using the same measurements and steps".
4. "Para terminar o lado esquerdo do layout, adicione o journaling card Destination do papel Notecards. Adira a 4" do topo e a 2,6" da esquerda. Adicione o chipboard Adventure na caixa vermelho directamente por baixo do título".
4. "To finish the left hand side of the layout, add the Destination journaling card from the Notecards paper. Adhere it 4” from the top and 2.6 from the left. Add the Adventure chipboard word in the red box directly under the Destination title".
5. "Coloque a sua foto com 5x3,25" no Journaling card, a cerca de 0,75 do lado esquerdo. Faça uma camada com a foto e a palavra You are Here cortada em caixa do papel de etiquetas. Coloque-o no topo, no lado direito da etiqueta. Adicione o chipboard redondo a dizer Journey na parte inferior direita da foto. Adicione o canto da fotografia ao fundo inferior esquerdo. Adicione a segunda foto com 2,5x3,5"."
5. "Place your photo sized at 5 X 3.25” on the journaling card, about 0.75 from the left hand side. Layer the photo with the You are Here word box cut from the Labels paper. It goes on the top, right corner of the photo. Add the Journey chipboard circle to the lower right hand side of the photo. Add the photo corner to the bottom, left. Add the second photo, sized 2.5 X 3.5”."
6. "Para terminar o lado direito da página dupla adicione 3 fotos com 2,5x3,5" cada uma, colocando-as na linha horizontal. Adicione o chipboard Vacation e Highlight banners por baixo da primeira foto. Corte a "artisan" shape em vermelho do papel Ephemera. Alinhe-o do lado direito de modo a que se sobreponha à última foto. Adicione um botão e dois enamel dots."
6. "To finish the right hand side of the double page, Add three photos sized at 2.5 X 3.5”, staggering them across the horizontal line. Add the Vacation and Highlight chipboard banners under the first photo. Hand cut the artisan shape in red from the Ephemera paper. Line it up with the right hand side so it overlaps the last photo. Add a button and two enamel dots."
7. "Coloque a bússola de chipboard a cerca de 2,5" do topo e a 0,25" da esquerda. Adicione um botão ao centro. Construa o seu título à direita da bússola e adicione algum Journaling".
7. "Place the chipboard compass about 2.5” from the top and 0.25” from the left. Add a button to the center. Build your title to the right of the compass and add journaling".
terça-feira, 5 de fevereiro de 2013
Travel Mini-Álbum
Para além das designers já conhecidas, a Tubo de Ensaio conta com um grupo in-house de senhoras muito (pelo menos assim achamos) talentosas! A Rita Almeida a Susana Ornelas e a Patrícia Villas-Boas (ou seja eu). Neste espaço de terça-feira e para além da Carla Pimentel, Paula Pascual e Susan Azevedo, irão encontrar-nos a nós também! Esperamos que gostem mas sobretudo que os nossos trabalhos vos inspirem a criar!
Hi there! Today I bring you a small but fast mini album made using Teresa Collins Designs new line: Far & Away. This line is ideal to document, scrapbook or journal about your travels and that way have something that will for sure remind you of good times passed!
Besides the designers we have already presented you, we also have a group of ladies (that we believe to be talented) that work in-house: Rita Almeida, Susana Ornelas and Patrícia Villas-Boas (me). On our Tuesday post and besides Carla Pimentel, Paula Pascual and Susan Azevedo that you already know you will also find our projects. We hope you like them but most of all we hope they inspire you to create!
Vai precisar de * You will need:
- Far & Away collection pack
- Far & Away: photo corners, envelopes, notebooks set, sticker sheet, file folders
- Máquina Cinch e arames * Cinch machine and wires
- Stix2 PVA glue
- Almofadas 3D * 3D foam pads
1. Begin by cutting page FA1004 into two 6"x12" pieces and glue them together with PVA glue. let them dry.
2. Vinque no sentido vertical a 5 1/4" e 6 3/4". Corte duas tiras de papel com 6"x 2 1/2" de um dos papéis da colecção e cole-as por dentro da capa do álbum, encostado a cada uma das extremidades.
2. Score vertically at 5 1/4" and 6 3/4". Cut two strips of paper with 6"x 2 1/2" from one of the papers of the line and glue them inside of the cover, on each of the limits.
3. Corte várias folhas da colecção em peças com 5 1/2"x4". Corte a folha das etiquetas e retire as várias peças do accessory sheet. Retire dois dos file folders e organize as várias peças como gostar mais. Com a ajuda da máquina Cinch, ou outra similar, faça 6 furos e coloque as argolas.
3. Cut several pieces of paper with 5 1/2"x4". Cut the tag paper and remove all the pieces from the accessory sheet. Remove two of the file folders and organize all the pieces as you prefer. With the help with the Cinch machine or similar, make 6 wholes and place the binding rings.
4. Decore a capa como gostar mais e acabe por colocar um pequeno envelope na capa com uma frase bem sugestiva.
4. Decorate the cover as you like best and place the smaller envelope at a corner with a sugestive sentence on top of it.
5. Na parte de dentro, coloque do lado esquerdo o mini notebook e do lado direito o mini-álbum agora encadernado. Prenda cada uma destas peças nas pequenas bolsas que formou com as tiras.
5. On the inside cover, place on the left side the mini notebook and on the right side the binded mini-álbum. Place each of these pieces on the flaps created by the paper pieces you glued on the inside.
6. Decore o interior com fotografias, memorabilia, bilhetes e outras peças recolhidas. Divirta-se a criar!
6. Decorate the inside with photos, memorabilia, tickets and other items collected while you travled! have fun creating!
Espero que tenha gostado deste pequeno álbum e até breve!
I hope you liked this small album and see you soon!
segunda-feira, 4 de fevereiro de 2013
Teresa Collins Designs
Mais uma pequena mostra do que encontramos no CHA Winter, desta vez no stand da Teresa Collins! E estes lindos papéis já estão em Portugal! Aproveite para se inspirar com as criações feitas pela equipa desta fabulosa marca!
Here is another peak of what we found at CHA Winter, this time at Teresa Collin's Designs booth. And all these gorgeous papers are already in Portugal! Enjoy the criations made by the design team of this fabulous brand!
terça-feira, 22 de janeiro de 2013
Memories Brag book
Se tem filhos, sobrinhos ou afilhados, temos a certeza que gosta de ter fotografias deles sempre à mão! Para isso nada melhor do que fazer um mini álbum. Este "brag book" foi feito com a novíssima colecção da Teresa Collins Designs, Memories. É uma colecção fantástica! Esperamos que gostem e que se divirtam a fazer este livrinho!
If you have children, nephews or godchildren we are sure you like to have photos of them so you can take everywhere! And for that nothing better than to do a mini album. This brag book was made using Teresa Collins Designs new line, Memories. It is an amazing line! We hope you like it and that you have fun making this little book!
Para fazer o mini álbum vai precisar de sete tiras de papel da colecção com 10 cm cada, diversos acessórios, como ataches, botões, enamel dots, os envelopes e os file folders. Para criar a base do álbum usamos o cortante 658204 da Sizzix.
To make this mini álbum you are going to need seven 10 cm strips of paper from the line, and several accessoriesm, such as brads, buttons, enamel dots, envelopes and file folders. To make the base of the album we used sizzix die 658204.
Comece por cortar as folhas do álbum, usando para isso o cortante maior deste conjunto de Framelits. Das sete tiras cortamos oito peças base.
Start by cutting the album pages, using the largest die on this framelits pack. From the seven strips of paper we took eight pages.
Usando o cortante imediatamente abaixo deste, corte 6 fotografias diferentes, centrando o cortante na fotografia.
Using the die one size smaller, cut 6 photos of your choice, not forgetting to center the die on the photo.
Deixe uma peça para a capa e outra para a contra-capa sem fotografia e nas restantes cole uma fotografia em cada página. Decore a capa a seu gosto e adicione os diversos acessórios ao longo do mini álbum.
Leave a piece for the cover and another for the back cover and on the remaining ones glue a photo on each. Decorate the cover as you which and add the different accessories all along the pages of the mini album.
Fácil e divertido, certo? Esta nova colecção estará numa loja perto de si nas primeiras semanas de Fevereiro. Entretanto pode ir fazendo estes livros com outra colecção que tenha! Acredite que a espera vai valer a pena!
Easy and fun, right? This new line will be at a store close to you on the first weeks of February. In the meantime you can start making these books with other papers you have! Believe that the wait will be worth while!
If you have children, nephews or godchildren we are sure you like to have photos of them so you can take everywhere! And for that nothing better than to do a mini album. This brag book was made using Teresa Collins Designs new line, Memories. It is an amazing line! We hope you like it and that you have fun making this little book!
Para fazer o mini álbum vai precisar de sete tiras de papel da colecção com 10 cm cada, diversos acessórios, como ataches, botões, enamel dots, os envelopes e os file folders. Para criar a base do álbum usamos o cortante 658204 da Sizzix.
To make this mini álbum you are going to need seven 10 cm strips of paper from the line, and several accessoriesm, such as brads, buttons, enamel dots, envelopes and file folders. To make the base of the album we used sizzix die 658204.
Comece por cortar as folhas do álbum, usando para isso o cortante maior deste conjunto de Framelits. Das sete tiras cortamos oito peças base.
Start by cutting the album pages, using the largest die on this framelits pack. From the seven strips of paper we took eight pages.
Usando o cortante imediatamente abaixo deste, corte 6 fotografias diferentes, centrando o cortante na fotografia.
Using the die one size smaller, cut 6 photos of your choice, not forgetting to center the die on the photo.
Deixe uma peça para a capa e outra para a contra-capa sem fotografia e nas restantes cole uma fotografia em cada página. Decore a capa a seu gosto e adicione os diversos acessórios ao longo do mini álbum.
Leave a piece for the cover and another for the back cover and on the remaining ones glue a photo on each. Decorate the cover as you which and add the different accessories all along the pages of the mini album.
Fácil e divertido, certo? Esta nova colecção estará numa loja perto de si nas primeiras semanas de Fevereiro. Entretanto pode ir fazendo estes livros com outra colecção que tenha! Acredite que a espera vai valer a pena!
Easy and fun, right? This new line will be at a store close to you on the first weeks of February. In the meantime you can start making these books with other papers you have! Believe that the wait will be worth while!
quinta-feira, 3 de janeiro de 2013
Far & Away
Pois é, Far & Away é uma das novas linhas da Teresa Collins Designs. E este layout foi feito pela Teresa para a recordar da sua visita a Portugal, em Abril passado! Aqui fica o layout mas sobretudo um pouco de uma das novas linhas que chegará a Portugal no final de Janeiro!
So Far & Away is one of Teresa Collins Designs new lines and this layout has been made by Teresa herself to remind her of her trip to Portugal last april! Here is the layout but also a little of one of the brands new lines that will be here in the end of January!
quinta-feira, 20 de dezembro de 2012
Oh Christmas Tree.....
O natal está já tão, tão pertinho! Mas ainda temos tempo para uns projectos finais! Por isso aqui fica esta deliciosa Árvore de Natal pelas mãos da Cheri Piles, uma das design team members da Teresa Collins!
Christmas is just so, so close! But there is still time for some final projects! So here it is this delicious Christma tree by the hands of Cheri Piles, one of Teresa Collins design team members!
"Adoro fazer estas pequenas rosetas, é um vício! Elas ficam fantásticas em presentes e podem fazê-las tão grandes ou tão pequenas como gostarem. Não há regras!
Eu começo por usar um cortante circular mas não é absolutamente necessário- Seria provavelmente mais fácil e rápido desenhar os círculos e cortá-los com uma tesoura decorativa.
"I love making these little rosettes - it's an addiction, they look great on gifts and you can make them as big or small as you would like! There really are no rules!
I start with using a circle cutter but you don't have to - it would probably be easier and less steps to trace the circle then cut it with your decorative scissors.
Primeiro passo- *Corte o círculo e depois uma espiral, usando uma tesoura decorativa, como se vê no topo da imagem.
Segundo passo- TOTALMENTE OPCIONAL- Escureça as bordas com Distress ink pads.
Terceiro passo- Começando de fora para dentro, enrole a flor. Quando começa a enrolar escolha qual é o padrão que quer que fique para dentro. Quando chega ao centro esta torna-se na base onde iremos colar e assentar a flor.
Quarto passo- Eu uso cola quente, porque funciona melhor e é mais rápido mas pode usar a sua cola preferida para este efeito. É só pressionar 10 segundos e já está colada!
* vai precisar de 4 tamanhos diferentes- grande, médio, pequeno e muito pequeno para o topo da árvore.
Step one - *cut your circle, then cut in a spiral shape using decorative scissors as shown in the top photo.
Step two - TOTALLY OPTIONAL - Ink the edges
Step three - Starting with the outside working your way to the center roll it up. When you start rolling you want the pattern on the "inside" of the roll. When you reach the center, it becomes the "shelf" where you will apply your glue.
Step four - I use hot glue, this just works best for me but you can try your favorite glue and see if it works. Then just press and hold all the layers into the glue for about... 10 seconds or so.
* - you will need to make about 4 sizes - big, medium, small and a few extra small for the tip top of the tree.
Para fazer a árvore vai precisar de muitas flores, por isso aqui fica a minha dica: Corte à mão ou com uma máquina (porque não usar a Sizzix big shot) os seus círculos de todos os papéis e depois pegar numa daquelas mesas de colocar nos joelhos e sentar-se na sua cadeira mais confortável à frente da televisão enquanto vê o seu filme de Natal preferido, enquanto escurece, enrola e cola as flores. Vai ver que parece tudo muito mais rápido!
To make the tree you are going to need to make a bunch of these. So here's my TIP: Trace or cut your circles from all of your papers then grab a lap table and go sit in your comfy chair and watch your favorite Christmas movie while you ink, roll and glue, it makes the time go wayyyyyy faster!
A foto mostra algumas das coisas que utilizei e metade das flores necessárias para cobrir o cone!
Passo 5- Encha o cone com espuma ou tecido.
Passo 6- Corte um círculo de cartão um pouco mais largo que a base do cone, desenhe neste um círculo ligeiramente mais pequeno que a base do cone e faça pequenos cortes da extremidade até este círculo interior, de 2 em 2 cm aproximadamente.
Passo 7- Desenhe onde vai colar o suporte para velas na base exterior do cone (mas só a cole no final!).
Passo 8- Cole a base ao cone, colando para isso os pequenos cortes no interior do cone. Quando terminar cole o suporte de vela à base mas certificando-se que tudo está centrado! Não fica lindo?
The photo on the left is just a little sampling of the supplies I used and only about half of the flowers. I bought the tree cone at Ben Franklin Crafts along with the candle stick holder.
Step 5 - Fill your cone with foam or tissue.
Step 6 - Cut a circle from chipboard a little wider then your base of the cone, trace a circle a little smaller than your base onto your chipboard. Every inch or so cut triangles into the inner circle.
Step 7 - Trace where you will glue your tree onto your candlestick holder (Glue it on very, very last)
Step 8 - Glue the tabs to the inside of the cone evenly so your candlestick holder and tree will stand evenly when completed - you really don't want to go to all of this work and have a lopsided tree.
não estão lindas as flores? * doesn't that look pretty?
Passo 9- Para ser mais fácil, alinhei as flores em linhas, da maior para a mais pequena.
Passo 10- Se tiver uma fita, cole-a agora no fundo da árvore.
Passo 11- Começando do fundo para cima, comece por colar as flores grandes, alternando as cores à medida que vai colando.
Step 10 - If you have decorative ribbon or trim adhere it to the bottom of your tree now.
Step 11 - Starting at the bottom, using big flowers start gluing, alternating the flower colors as you go.
Aqui está um primeiro plano da árvore completa! * Here's one more close up of it completed.
Vai precisar de: duas folhas de cada da colecção Christmas Cottage (eu acabei por não usar na totalidade a segunda folha, num total de 10 folhas). O meu cone tinha 11" de altura e cortei 9 rosetas com 3", 6 rosetas com 2 1/4", 6 rosetas com 1 3/4" e uma com 1 3/8" para o topo."
Supplies used: Two sheets of each from the CHRISTMAS COTTAGE collection 10 sheets total for a big cone: Doily Tree back, Medallion, Red Snowflakes back, Sentiments back, Music. (I didn't quite use all of the 2nd sheet from each one it was just about 1/2 of the 2nd page)
Depending on the size of cone you have will determine how many rosettes you will need, it will also depend on how big or small you cut your rosettes.
My cone was 11" tall. I cut 9 - 3", 6 - 2 1/4", 6 1 3/4", 1 3/8" for the top."
PS - the name of the scissors I used was "bounce" - There is not a manufacturer's name on them, or I've rubbed it off from use.
Subscrever:
Mensagens (Atom)